Making a File Folder Game


Kay is having a birthday soon,
so the girls and I made a file folder game for both Kay and Jay. Kay still loves pigs, and Jay still loves frogs so we made a shadow matching game for them both.
I started by finding several different cute pictures and printed out two copies.

One I colored over with a black Sharpie and glued to one side of the file folder. The other I laminated and cut out. I covered the file folder with clear contact paper. I then put magnets on the laminated pigs and corresponding shadow. I added a plastic bag to put the pieces in that magnetically clips to the folder and done!


We like using file folder games and activities during the day and take them with us in the car and to church where quiet activities help to keep them reverent. The magnets are quiet and keep everything in one place.

This site has fun file folder games you can print out and make. If you'd like to make this file folder, click here for shadows and here for images.
e_signature

Crochet with Tulle

Make a Long-Lasting and Easy to Clean Scrubby.


This will soon become your favorite dish tool. It works great, gets into cups and other small spaces and cleans up great after throwing it into the dishwasher with the other dishes. It also does not fall apart like the ones you buy at the store and it's CHEAP. For this {little project}, you'll need 3/4 yard of tulle or netting from the fabric store, and a crochet hook. You do not need a special hook, and crocheting with tulle or netting is not harder than yarn. It's easy to hook and pulls through all together. If you've ever crocheted a hat, this will be a cinch.

First start by making your "yarn" by cutting a zig zag pattern 1"- 2" inches wide out of your fabric. You can round the corners, or simply cut off any excess after the fact. The corners tend to poke out as you go.


Below I've included a basic pattern. You want your circle to be flat so if it starts to curve in, you need to crochet two-single-crochet-stitches-in-one-hole more often. If it starts to become wavy, you need to space your two-single-crochet-in-one-holes farther apart.

Start by Chaining 6 and connecting to first chain with a slip stitch to form a small circle.
Inside your hole, single crochet 6 times.
Now start spiraling out crocheting in circles.
On the next 2 rows put two single crochets, in each previous rows, single crochet hole.
On the next row, alternate putting two single crochets and one single crochet in each hole/stitch.
On the next row, put two single crochets in every third hole.
On the next row, put two single crochets in every fourth hole etc.

I'm not always very good at counting stitches especially if I'm interrupted so I use the go with how it looks method described above.

As you can probably tell from my instructions, I tend to learn my new crocheting projects from people rather than patterns. If you have questions, please leave a comment and I'll do my best to answer, or ask your friend/aunt who is a crochet guru.


Good Luck With the Dishes!

e_signature

Canning Tomatoes

It's that time of year:

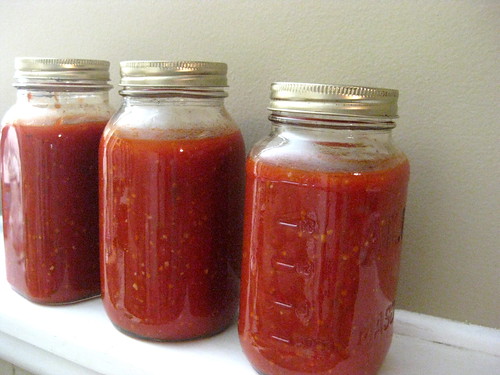
We've had more tomatoes than we know what to do with growing in our garden. So I turned them into about a dozen quarts of tomato sauce. It was my first time doing {This Little Project} and I'm sure they'll be gone in no time.

Every time I try to do canning I feel like a bit of a canning fraud. Meaning, it's not really natural to me. I have to think through every step and each year I feel like I start from scratch again. So, if I can do this you can too!
This is my go-to book for canning info and recipes:


It's got pretty much everything in there. My other resource is multiple calls to my Mother ;)
I used the recipe for a chunky sauce. And I hope to do applesauce soon. I love using what's in our garden. There is something about knowing where your food comes from I guess!

{This Little Project} takes up a good portion of the afternoon, but it sure is tasty!


p.s. I chanced on another blog I have loved reading and wanted to share with you. This link will take you to more tomato canning goodness. But explore a little and you'll find lots of goodies.

DollHouse


I found this CD shelf in the shape of a dollhouse at Michaels on Clearance for $1.99 . I brought it home and the girls painted it pink - of course. Afterwards, we used white out pens to decorate the house and add details. The pen was easy for my 4 year old to use, but my two year old needed help. It's now ready for our little dolls to enter and play!

IMG_1388 IMG_1384

What do your dolls play in?
e_signature

ConKerr Cancer Project

If you aren't familiar with Craft Hope, you'll certainly want to check it out. The little projects there bring many hands together and bless the lives of so many.

I've been busy helping some of the young women in our church make pillowcases for our local chapter of ConKerr Cancer, which is a current project running with Craft Hope. We just finished up 28 pillowcases to brighten the lives of children who are sick with cancer.
It has been so rewarding to see these girls reach out and care for others and learn to sew a little in the process ;)

This is just one of the great projects you can get involved with. To participate go here:
Craft Hope Spreading seeds of hope one stitch at a time

Bathroom Mirror Makeover

IMG_1240 IMG_1335

My bathroom mirror is a little rusty around the edges but otherwise in great shape, so I thought I'd put a frame around it to make it look a little nicer.
I bought some inexpensive molding at the hardware store and used my table saw to cut it to length. Make sure that you the measurement is from point to point. I also used my dremel tool to carve out two spots for where the mirror attached to the wall.
I glued the bottom piece of molding to the mirror using hot glue. I wanted the two side pieces to go to the wall and as they didn't overlap the mirror enough to use the hot glue without showing, I had to nail the other pieces of molding to the wall using finishing nails.
I predrilled holes in the molding in the middle of the board so it would be easier to nail on and also not split the molding. If you drill the hole too close to the wall side of the molding, it's hard to hammer without hitting the while. You also can't get to close to the mirror side, or you'll hit the mirror. Once all the nails were in the board, I nailed them in most of the way with the hammer.
IMG_1242 IMG_1249 IMG_1254

I then used a nail set to finish nailing the nail in so that the hammer wouldn't damage the wood.

IMG_1259 IMG_1256 IMG_1245

After the molding was up, I used wood filler to cover the nail holes and fill the gaps in the corners where the two pieces came together. You could also use caulk, spackle or putty. The last thing I did, was sand the wood filler and touch up the paint.

IMG_1261

Voilá!


You can check out this tutorial as well as several other do-it-yourself projects at

The DIY Show Off
e_signature

School Table Re-Do Project

We moved to our home about 3 months ago. One of the things I love about it is that there is a small room off of the front room that is perfect for a learning space. It's the kind of space that you can close the door on and make a mess (actually it's the kids who do that in this room) and no one has to see it! It's a sanity savor room!

One of the things I knew we needed was a kid-sized work table. I fell in love with this one from Pottery Barn:
Carolina Craft Table

It was the perfect height for the kids to STAND or SIT at. I loved that. But I wanted it for less $ and I wanted more storage in it. So I was still deciding....

Then I saw this kid's vanity for $10 at a yard sale. They say that beauty is in the eye of the beholder. And I was seeing a BEAUTY! It happened to be the EXACT same height as the Pottery Barn one and I knew it was meant for me!
I pulled the center piece of wood out and had my storage for each of the kids in the two sets of drawers. With a good coat of paint and liners in the drawers they were done.

Then I stopped at the ReStore and picked up this island counter top (which is easier to clean and I don't have to worry about what they can do to it-for $30) and put it on top. Done!
It's the exact same size as the table I loved with all the features we needed. I love this kind of {Little Project}! With school starting this little beauty is going to make life so much easier!

Coming up, I'll show how all we keep the learning room equipped and ready for learning ;)

What kind of kid-friendly space do you make for your kids?

Joining in here:
abc button

Ice Cream Parlor for Kids


My kids have had such a great time pretending with {This Little Project}. They make (and taste) all kids of flavors. It's been great for coordination too, and sooo easy to clean up (compared to the real thing)!

I put all of the different "flavors" of pom poms in the striped container. They use the scoopers to scoop them into the ice cream cups-complete with a cherry on top!

Then they use the spoons (which are smaller-so they require more control) to "eat" the ice cream and dump it back into the original container.

The ice cream cups are from Jo-Ann's but I've seen similar ones at the Dollar Tree. The spoons are also from Dollar Tree. The pon poms are just the extra big kind. They make perfectly large "scoops" of ice cream!

If all this ice cream makes you want to eat some, try these recipes that Elspeth posted for National ice cream month ;)
Enjoy!

LinkWithin Related Stories Widget for Blogs Add to Technorati Favorites Share/Save/Bookmark