Friday Favorites and Freebies

Happy Friday!  I'm so glad the weekend is here!  Here are some of my favorites to share with you:

I am in love with this simple declaration from this Etsy Shop
She Belived She Could - Inspirational Art Print (5 x 7

I used this pattern to make Jay's bat wings (yes! he did change his mind and I didn't have to come up with a praying mantis costume--whew!!)  It's so simple to make-genius!


I have a feeling we are going to be having a lot of fun on this site-you can print out all kinds of fun mazes to do! 

I love the simplicity of these Boo Bags-free printable for them too!

Wishing you a wonderful Weekend!


Skeletons and Dancing!


Today I'm over at abcand123learning.com teaching about your skeleton and making them dance around!

Perfect for Halloween, come on over!

abc button


Kid Friendly Pumpkin Decorating


With three kids age 5 and under, carving pumpkins just isn't a fun {little project}.  Knives and babies just aren't a great mix and it always turns into such a mess. 
Plus, after the kids pick out their favorite pumpkin at the patch the squirrels always eat them!  
So....

 Instead of them being heart-broken about their carved masterpiece turning into squirrel food and me stressing that someone is going to loose an eye, we do kid-friendly pumpkin {projects} at our house. 

 This year we made edible pumpkins and they took on a "mr. potato head" look.

See what I mean?
 Did you know that rice krispies make great pumpkins?!

Here's what you need to make {this little project}
Marshmallows (I used colored since we were dying them but it doesn't matter)
Rice cereal (larger pumpkins require more)
food coloring (red and yellow)
Cereal Straws (apple jacks kind-for the stem)
butter/margarine

How to make {this little project}
I made my rice krispie treats in the microwave--this is a kid-friendly {little project}, right?

  Just follow the recipe on the box.  I put the butter/margarine and marshmallows in a microwave-safe bowl for a little more than a minute.  If you watch them they start to expand really big (the kids love that!)  When they get pretty big I take them out and stir them together.  This is the time to add your food dye (BEFORE adding the cereal!)

After you have the color that you want and have stirred the marshmallows and butter/margarine together, add your rice cereal and stir together. 

To form your pumpkins you need super greasy hands.  We rubbed some butter on our fingers and then formed the pumpkins.

For the pumpkin face "parts" we picked up a couple of packages of them at the Dollar Tree.  Also, it helps if you let the "pumpkin treats" sit for a couple of minutes before you put the pumpkin face parts on.

p.s. here are more survival tips for cooking with kids.


This is Kay's {little} pumpkin.  After we took regular photos they went crazy and we ended up with what I call, "picaso pumpkins."  You can use your imagination on that...body parts in all kinds of places.  

They were very proud of their silliness and wanted me to take their picture with them making silly faces next to their silly pumpkins...oh the fun memories!  It was a family night activity we'll remember!


Little Ellie made her own kind of "picaso pumpkin."  I put the "face parts" on magnets so she can decorate her pumpkin again and again.


It's a {little} spooky to have your food look like it could talk to you!

Have fun making a kid-friendly Halloween {little project}!

October Sensory Bin

The kiddos are having fun so much fun with our sensory bin so I thought I would share a peek at it.  With it turning so cold outside we've been using it more and more.

We colored some rice, added some black beans and with scoops, baskets, and treasures to dig for.  They love it!

I made a couple of sieves in {this little project}, with directions to make your own.

And for directions on how make your own colored rice, check out this post.

The colored rice lasts really well in a zip lock bag and I switch out the colors and theme as the months change.  

It's a fun way to build those fine motor skills (with a {little} to sweep up afterwards). 
But it's worth it :)

Egg Carton Math Games

We've been using {this little project} this week to practice math.  It's kind of like the handwriting helper {project} we did before.  

It makes math into a game!


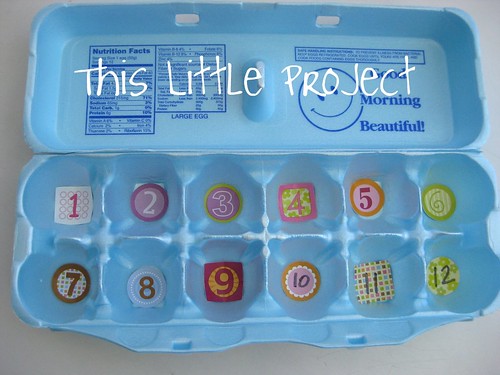
So, how does {this little} math helper work?

All you need is a numbered egg carton and 2 different colored pom poms to play the game.

Toss both pom poms into the egg carton.  


There are a bunch of ways to use {this little project} as a game.  


First, math game ideas for the older kids:


If you are doing subtraction you write down the larger of the numbers and subtract the other number that the pom pom landed in from it.


Write both numbers down and then < or > for the greater/smaller.


For addition, add both the numbers together that the pom poms landed in.


For multiplication...you get it...you multiply them....etc.


Math Game Ideas for younger kids:


Toss both in and figure out which one is the larger number.  Which is the smaller number?


Toss just one in and practice writing the number.


Toss two in and make it a double digit number and say and write what it is.


My kids are young and love to use manipulatives for math.  


Whichever game we choose to play we like to get out the chalkboard or whiteboard.  Somehow that makes it more of a game than just using a pencil and paper.


 I always feel good when we re-use something from the invention box so doing {this little project} was double the fun :)


Pin It

Celebrating the Music-with chocolate books!


I've been celebrating a lot music making with my students lately.  They have been finishing up everything from sonatinas to their "books" and I wanted to do something to celebrate their diligent work.

{This little project} is chocolate disguised as a music book.  


My inspiration for {this little project} came from a book idea a friend made that I knew would be perfect to adapt for my music students.

To make {this little project} you need:

mini chocolate bars

card stock

music images-see below

double-sided tape

1/8" ribbon (about 4 inches for each)


{This little project} starts with two mini chocolate bars and some double-sided tape on card stock:

Depending on which way your book image is oriented the chocolates go horizontal or vertical.


Then I just made miniatures of their books/music (via images in google) and printed them to fit the size of the candy:


A little ribbon book mark (starts under the chocolate bar) with more double-sided tape and you're done!


The kids were so excited to receive their surprise reward!  


{This little project} would be perfect for celebrating a choir, band, or orchestra event as well as finishing a difficult piece {think festival, solo/ensemble, or Christmas concerts, etc.) 

I love it when {little projects} taste good too!  Happy Celebrating!


Wall of Fame

As previously posted at brown paper packages as part of back-to-basics. 


Today's {little project} is about celebrating what comes home in your child's backpack.

I know you groan to have to go through it.  But {this little project} today will help both of you look forward to going through the "treasures" and papers that come home each day.

why?

Because we are making 
a "Wall of Fame!"

To make {this little project} you simply to replace the glass in your frames with cork board so they look like this:

{little project tip} that cork that comes in a roll is great, but it's super thin.  So if you use it (like I did) you will want to also cut identical pieces of cardboard to go behind it.  You can use a spray adhesive to hold them together.

Different sizes of frames let you celebrate many kinds of achievements.  I used a variety of sizes and including construction paper-sized, and a shelf frame for the 3D art projects to be displayed on.


I spay painted my frames black because they are in our dining room.  But colored ones up in a playroom would be so fun too!

Then to make {this little project} more personal, I cut out monogram cardboard letters and covered them with fun yarn and twine textures.  


Our three kids just happen to have first names that are alphabetical.  But these were sooo easy and fun that I'm making "BOO" ones next!


Here's the final "Wall of Fame" where the celebration is ready to begin!


See?  How excited is your little one going to be to see their own work up on the "wall of fame!"

Have fun Celebrating!

p.s. if you want to know more about those fun tiny letters in the frame, you'll find them in {this little reading project} or {this little music project}.


The Music doesn't end...

I am over at The Teaching Studio to share my Musical Practice Abacus.  There is magic in {this little project}!

If you have kids that play a musical instrument you will want to check it out.  Jenny has some wonderful teaching ideas to share!


On another note, I will be taking a few days off to be with family.  My husband's grandmother passed away this week.  Since we believe that death is not the end, we are comforted in missing her but not feeling like we have lost her.  

She was a musician herself and sang in the world renown Mormon Tabernacle Choir for many years.  They will be performing this weekend in General Conference which is so fitting for remembering her. If you would like to hear the choir perform, tune in here.

It's comforting at a time like this to know the music doesn't end.

I'll be back in a few days...