My Favorite Swimsuit

Yes, that's really how I feel about the swimsuit I found this year.  It was TIME for a new suit.  I don't know how much you enjoy shopping for a swimsuit, but I think it's safe to say that most of us don't love it.  It can be more than a {Little Project} to find the right one.

My goals for a swimsuit were these:

1- Not to look like a frumpy mom.

2- Wear something flattering.  For me, this means wearing a suit that shows my best me-not just the skin on me.  I'm more than a body, right?  So I want something that is modest and cute and shows that I'm confident enough about who I am as a woman that I don't need to show the whole world what they don't need to see-know what I mean?  


So, I feel really lucky to have found this swimwear company:


Lime Ricki is just my style (see goals above) and they have a TON OF OPTIONS.  I love the mix and match aspect too!

(no compensation for this blog post, by the way-just love these suits!)

I know that the rest of the world has probably had enough warm weather to have been swimming already, but here it's still too cold :(  Serious sadness about that!

But when we were on vacation last week we were visiting the red rock of the west it was WARM!  So I got to swim-finally!  And now I know for sure that I love these suits!  

So even if you already have your suit for this year, read on; you might find something you love too!

Let me introduce you to these darling 


Ruffles!  On a suit!  And so cute!

and these skirts are just one of their styles of bottoms (my personal favorite though).

Now a fun top to go with it:


DALLAS-170.jpgALEXANDRIA-170.jpgSHELBY-170.jpg

Cute tops, but not cut too low.  No overload of cleavage.  Smart looking-don't you think?  There are a bunch of fun styles to mix and match with.  The back of the suits are well-done too-go look!

Now for my other favorite:  The swimdress.
RICKI-170.jpg


Now, this photo doesn't do justice for how cute this suit really is.
Sorry, this photo of me in it isn't much help either for you since it's in the water...but that's all I have.


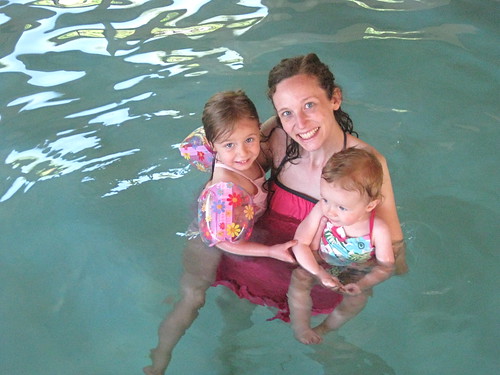
 This is actually a one piece suit (the grey bottoms goes all the way up) and then the pink goes over the top.  It's connected under the bust and then hangs tight to you for the rest.
And yes... more ruffles!

So if you want the skirt look while you walk around or a cute one-piece look you can have either.  There is enough fabric to have the end of the dress hit in a variety of heights on the leg.  Clever, huh?

If you are like me and love a classy and covered look instead of the bare/meaty look, here are a few more of my favorite sites:

Happy shopping, a fun {Little Project!}
;)


Quiet Books (for church)


Update!! 
Heather at Simply Fresh Designs has graciously shared theses books again with all of us, without the images this time, due to copyright issues-but you can add your own.


This is so kind of her.  She just had a new baby!  If you stop by be sure to thank her!
Here are the books she has available so far:

The Life of Christ

Teachings of Christ

We Believe
 
Old Testament

Book of Mormon Stories

Prophets and Apostles

ALSO!!

I have been using these
 

darling "bright ideas" in the same way.  
I download them (free) from this site, print them as a photo,
and put them in a photo album book. 
(They are published each month in the Children's Friend magazine.)

I also put them out for our morning devotional.  I think the pictures help the kids remember the scriptures and I'm always amazed that my 4 year old can memorize a scripture a week.
The {little} things really do count!

These amazing printable church quiet books are designed by the incredibly talented and gracious Heather at Simply Fresh Designs.


Since I just traveled to see many friends and family I took 12 of them to give away.  So many people asked where I got them that I thought I should share it here too!   Thanks to my sweet friend Kierste at brown paper packages for introducing me to these.


Each of Heather's books is beautifully done and she graciously allows downloads of them for free so that you can print your own.  I so appreciate her sharing her talents!  What blessings these little books are for me, and so many friends and family members.


I realize that many of you aren't-but if you also belong to The Church of Jesus Christ of Latter-day Saints aka (Mormon) like I do-I think you will really like them too.  And if not, maybe the ideas you see will help you create something similar that your family will love.  I'm still looking for an an Old Testament one-so far just New Testament is available-so please share if you have ideas for Bible quiet books!


Heather has created 5 different books:


New Testament (This is her newest)


Prophets and Apostles


Articles of Faith


We Believe


The Book of Mormon


Heather designed them so you can download and then print them as 4x6 photos and slip them into a photo album book.  I found my photo books at the dollar store or at Walmart.  Does it get any easier than that?  {This Little Project} is easy!


Jay loves to read them.
 Kay likes to look at the pictures.
 And Ellie likes to turn the pages and eat them!

In other words, {This Little Project} is perfect for us!


Rice Krispie Sprinkle-Balls!

Confession:  I {LOVE} sprinkles.  
 I love them as in there is a canister of sprinkles to match every holiday of the year in my cupboard. 

I have been a devoted cupcake-maker since I was a kid just so I could use the sprinkles!

I was experimenting in the kitchen making Easter treats and found that my little rice krispie balls are perfectly sticky for holding onto my SPRINKLES too!

Want to see?

To make {This Little Project} you need:
rice krispie treats (follow directions on package)
butter
SPRINKLES in a bowl!

{Little Project Tip:} you can make your rice krispie treats in the microwave (I always do).  Just put the butter and marshmallows in a microwave safe bowl for about 2 minutes (give or take) and watch them expand in the microwave.  My kids love watching them.  When every thing is nice and gooey take the bowl out and add the rice krispie cereal and stir.


To make the rice-krispie balls:
1- Rub some butter on your hands

2- Pat the rice krispie mixture into a ball in your hands. 

3-Dip the ball into the sprinkles on each side.

Ta Da!  FUN Sprinkled Treats!!

{This Little Project} was a yummy one!

These rice krispie sprinkle-balls fit perfectly into our Muffin Tin Lunch too!
And since I was on a sprinkle kick, I added some sprinkles to the yogurt too.  
Don't worry-my kids get plenty of sugar ;)


It's fun to have another excuse to make a treat with sprinkles!

Flower Headband

I recently made some of these quick flower headbands for Kay and her cousin. 

 {This Little Project} whips up so quick, makes a great gift and makes it feel more like springtime!


If you haven't made a flower from fabric before, take a look at this tutorial.

If you want to make {This Little Project} 
here are some tips:

I wrapped the flower and then hot glued it together between layers. You could also hot glue as you go, but I liked being able to adjust the final look so I waited to the end.

Any fabric works. I did one with t-shirt fabric too (no photo).

After the flower is glued together I glued the center back of the flower to a small piece of fabric-bigger than the flower. I used that piece of fabric to secure the flower to the headband. It's more secure that way-just wrap it down under the headband and hot glue in place.

Have fun wearing flowers!

Travel-Sized Button Garden

We're getting ready to go visit grandma and grandpa-yay!  I made this Felt Button Garden about a month ago for Kay and it has been on vacation with us twice now.  

{This Little Project} is going with us again because it rolls up nice and small and is a great hands-on coordination builder for long car and airplane rides.


Want to make {This Little Project}?

You need:

Felt in a variety of colors

scissors

buttons

needle and thread

First I cut the shapes free hand and then stitched them onto a piece of felt by hand too, along with the buttons.  The whole thing took about an hour. 


It's fun to use a variety of colors and sizes for your buttons.

Then cut a little slit in each of your flower shapes so they can be buttoned on:


I think I may add some sunshine and a cloud sometime, now that it's looking warmer outside here.

Kay really enjoys playing with this and is getting really good and doing buttons.


Plus, it's kinda fun having a garden that can travel.  We're going to have to find someone to water our other one while we're gone.  


Mothers Day Gift-Carry On

I recently threw a baby shower for a friend of mine.  The colors were pink and brown to celebrate her little girl.  

As I was working out the decorations I came across this print and thought to myself, "Every Mother should have one of these hanging in her home!"  


Seriously!  Staying calm and carrying on....it's what we do (or try to do!) everyday!

I used {This Little Project} as a decoration for the shower and also as part of my gift to her.  

I love how the twined hanger turned out with the clothes pins

 It's an inexpensive and unique way to display this quote. 

 I made it to hang in her nursery but as you can see below-it doesn't have to be hung to be displayed this way:


Want to make {This Little Project} too? 
(you know a Mom that would love it too, don't you!)

Well, you're in luck because Heather at Simply Fresh Designs has created a free printable of this quote in 8 darling color choices for you!  

Go here to read more about the neat history of this quote and to download yours!

{Little Project Tip} I don't do a lot of color printing at home.  The quality just isn't the best.  But instead of doing a 8x 10 photo print, I often will choose a color copy at Staples (59 cents).  The quality is always awesome and it's a fraction of the photo printing price.  Depending on how you choose to frame it, it can be just the right thing!

For {This Little Project} I mounted/glued this color copy to a piece of chip board to give it support.

The two clothes pins hold it to the hanger.

To "twine" your hanger you need:

 a plastic hanger (I used a child sized one) 

a roll of twine

hot glue gun

scissors

First, glue the end of your twine to the end of the "hook" of the hanger.  Start wrapping and glue as you go.  I glued every 10 wraps or so.  Just enough to hold it in place as you move down the hanger.  The hook is the easiest part to do because it is easy to wrap around.  

To do the other part of the hanger you may want to unwrap a long piece of twine and cut it.  Then wrap it and glue as you go until it's done. Then repeat until the rest is covered.  This is because you can't really fit the ball of twine through the inside of the hanger very well so it's easier to just have a piece to work with.  Try it and you'll see what I mean ;)

Happy Mothers Day to all you wonderful Mothers who are gracious enough to stop by and read here at {This Little Project}.  I hope you have a beautiful day!


LinkWithin Related Stories Widget for Blogs Add to Technorati Favorites Share/Save/Bookmark