Christmas Songs for Kids

I'm over at abcand123learning.com today writing about enjoying Christmas music with kids 
and how to get their whole bodies involved in the fun!


Come on over and see what all this flying is about!


abc button


Thanksgiving Tangrams (free)

We have been having a lot of fun designing some Thanksgiving tangrams in our math work this week.  I started out making {this little project}, but Jay quickly took the lead.  I love watching {little} people at work.  It gives a glimpse into what's on their mind.

Since there aren't many Thanksgiving tangrams available for use on the web, I've included pictures for anyone else wanting to do {this little project}.  I was going to upload the printable patterns, but my scanner isn't working.  Hopefully the photos will be inspiration enough to get you going.

No offense intended in any of these depictions.  After all there's only so much detail you can do with simple shapes.

My turkey:


Jay's turkey:

See what I mean?  I love it!

He also made a {little} baby turkey:


A Native American headdress:


A bow and arrow (this was Jay's idea all the way):


Native American sitting:


Pilgrim:


Pineapple?  I know, it's not really a traditional Thanksgiving idea.  But trying to make corn turned into pineapple.  Oh well!

And after we finished ours, I looked on the web and loved the ones we found here, especially the mayflower.  We'll have to try that one now!

This is what we use to create our tangrams:

If you have kids coming to your Thanksgiving dinner, challenging them to create their own Thanksgiving tangrams should keep the the {little} people busy for awhile!


Thanksgiving in the Village

It's still one of our favorite {little projects}.

Well, we took our pilgrim peg doll family and put them in their "village" this week.  

{This Little Project} has brought Thanksgiving to life.
It's been serious fun!  


I love watching {little} hands learn through play.  


Initially, I wasn't sure how much Ellie would use {this little project} because of how young she is.
But she loved it!


We used some wood log blocks to make a {little} house for our pilgrim family.

Then Jay and Kay got out our animals and other friends from "the village." 

 The two older kids have really had fun sailing our family on the "Mayflower" boat and pretending to hunt for food and make friends with the natives.


We got out the village park for some green space to play and "plant seeds" on.

And you know I have to sneak some spelling fun in.  Our village tradition has been to use scrabble tiles to name things in the village.


The village isn't all historically accurate (or to scale--check out our chicken above--and our toy turkey is as tall as the pilgrims!)
 
And all kinds of friends come to visit!


Jay found some twigs outside and we "lashed" some together with yarn for 2 teepees and then used the extras for a little camp fire.


I think next year we'll make our family into indian peg dolls and live in the village from that perspective.

One of the things I love about the story of Thanksgiving is that it transcends time.  
I think of it any time our family moves to a new place or when I meet new people.  You're either the newbie (pilgrim) trying to get to know the natives and find your place in a new land. Or you're the native trying to understand and welcome the new person to your neighborhood.
It's a story that never gets old.  
History is always more about the now than we realize.


Can learning really be this fun?


I love having {little} people at my house!


p.s. here's a look at our Christmas in the Village from the archives in case you want to try a Christmas village at your house or school too.

Pilgrim Peg Dolls


Do you wonder what it would be like to be a pilgrim?  
We do.  

So I made {this little project} for the kids to use in their play this week while we look at the history behind Thanksgiving.  Learning through play makes the details of it all stick so much better (and it's so much more fun!)  

This is our family.  As wooden peg doll people.  

We look quite pious, don't you think?   :)


I found the "kids" standing here on a ruler on the floor today.  I wonder who put them there?


There's more to {this little project} for Thanksgiving play that I'll share tomorrow.  We're too busy playing with them for now.  :)


p.s. if you want to make your own peg people, check out {this little project} from the archives for more details.

Nature Art: Leaf Turkeys!

Yesterday our {little} nature walk and bike ride turned 
into an art project: a leaf turkey!


Lately many of our {little projects} are thought up by the {little} people I live with.  I love that!  

To make {this little project} you need:

 leaves: we collected a variety for the body and feathers
twigs, seed pods, etc. (Jay made a nest with a turkey egg)
maple leaf seeds that are stuck together make great birds in the sky
glue (we used elmer's)
paper to glue it to

Have fun creating art with nature!

More kid-inspired {little projects} to come  :)

Note Card Caddy

Sometimes I'm a sneaky mom.  
{This little project} looks like a box of fun stamps, cards, stickers, etc. 

But it is a disguise for teaching my kids how to write thank you notes and practice their handwriting and spelling.
We've been using it for a few months and they don't know it yet!

Even though I made {this little project} for the kids I decided that I had to make one for me too!  

At this time of year we take a little extra time to be grateful.  
{This little project} has made it a little easier 
to say "thank you" all year round.


Just today one of our neighbors gave Jay a plant (he loves plants!) when he came home he said, "Mom I should write her a thank you card."  That's music to a mom's ears.  

To make {this little project} 
I used a cleaning caddy because I love the handle and that it naturally separates all of our supplies.

Our Note Card Caddy has:
blank cards and envelopes (we send a lot of happy birthday cards too)
stamps and ink pads
colored pencils
stickers
addresses
postage stamps
crayons/markers

And just this week I picked these up for $1 each at Michaels.  With these six stamps you pretty much have every occasion covered.

And if you are nervous about kids and stamps/ink, here is a {little project tip}: I keep a couple of my old t-shirts near this box.  The kids can slip it on over their clothes and slip it back off when they are done.  easy.

We also wet a paper towel to stamp the extra ink off of the stamp.  I love watching them learn to take responsibility for their things.


Actually, this Note Card Caddy is an extension of {this little project} from the past.  
There's nothing like a pen pal for making writing fun!


Even with all our technology, there's nothing like getting a hand-written note.

Thanks for stopping by today!

Raspberry Cream Cheese French Toast

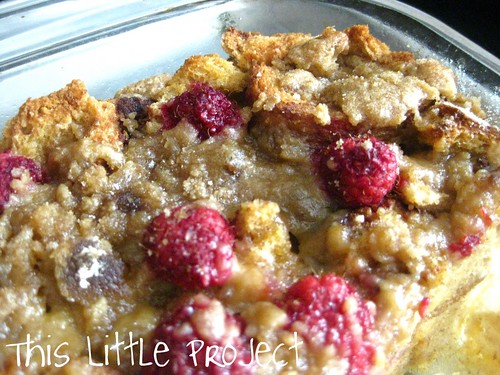
With Thanksgiving coming up and planning and recipe hunting underway, I wanted to share one of my favorite breakfast recipes.  {This Little Project} is the make-the-night-before goodness that makes for an easy morning.  On a holiday that is just what I need.

Usually I'm not much of a fan of french toast breakfast caseroles because they look kinda gross.  So, I'm delighted to share a {little} hint for making yours look good (and it's super yummy too!)


Oh, and if you are taking it to a brunch or other gathering (which I do a lot) than you'll also love that you don't have to take any syrup along.  All the goodness is baked right inside.

It looks so good that it makes you look good :)

Here's what you need to make 
{this yummy project}

Raspberry Cream Cheese French Toast:
3 cups milk
1 loaf of bread 
1 T. cinnamon (I love cinnamon but if you don't, use less)
8 oz cream cheese
10-12 eggs (depending on size)
1/2 cup maple syrup
vanilla 1 1/2 T
raspberries (frozen or fresh)

Streusel Topping ingredients:
4 T. softened butter or margarine
1/2 cup brown sugar
1/3 cup flour
1/2 t. cinnamon
a pinch of salt

To make {This Little Project}

1- Grease a 9x13 baking dish

2- Break up half the loaf of bread into bite-sized pieces and put in the backing dish.

3- Cut the cream cheese into small cubes.  And spread them over the bread.  I try to imagine that whoever is eating it gets a little piece of cream cheese in each bite-so that's an idea of how to cut and spread it out.

4- Break up the other half of the loaf of bread into bite-sized pieces and spread over the cream cheese in the dish.

5- Prepare the egg mixture in a separate mixing bowl: Combine the eggs, syrup, milk, vanilla, and cinnamon. Whisk them together.

6- Pour the egg mixture evenly over the bread in the baking dish.  I always press down/flatten any bread that isn't covered so that it all gets soaked.

7- Cover and refrigerate overnight.

8- In the morning make the streusel topping and sprinkle over the top.

9- Sprinkle the raspberries over the streusel topping.

10- Cook uncovered 375 degrees for 50-60 minutes
Be sure to check the middle-if the middle it's not done, cook longer.


When you take it out it looks pretty.  I love pretty food.


Enjoy!

Organizing School Work and Art Projects

A few weeks ago I shared our Wall of Fame with you.  It's been a fun place to celebrate learning.  

Today I want to share with you some organizing ideas that we've been doing for the past 2 years. 
{This little project} has worked really well in our family for keeping us organized and for taming the paper monster that comes with school work and kids. 

Where do those things go after 
they are done on the wall?  


And since they can't all go on the wall
where do the other favorites go?

Into a book:


Let me tell you why I love {this little project}:

*  My kids really enjoy looking back at what they have accomplished in the past.  It helps them see that they have made progress.  And it's especially great for them to see that they have tackled something hard before.  And succeeded.  It gives them courage to try hard again.


*  And looking back is also a fun way to review what they have already learned.

*  There is a lot more satisfaction in creating something great if you know it won't become garbage tomorrow.  

*  It's fun to see what the kids were learning at their different ages.

*  They know that most-especially their favorites-will be displayed as well as treasured. 

*  Binders are super easy to store.  And they don't take a lot of space.

So how do we keep this all organized?


All you need to make {this little project} is:
a binder 
 calendar pages (one for each month). I printed my calendars here.
a 3-hole punch
a place/tray to gather completed school work 
page protectors (12)

First, punch holes in your calendars and put them in the binder. You need one for each child.  Be sure to label the child's name and the year on it.

I like to put a page protector in the binder with each month to hold small things or things that don't punch very well--like books and small art pieces.

Then, each day when you clean out their backpack, you (or the child) puts the things you want to keep in a folder or tray for each child, (or on your own wall of fame!)

At the end of each week you just hole punch everything in the folder/tray and put them in the binder behind the current calendar month.

easy, huh?


But, what do you do with the "big" things that won't fit in the binder?  

 *  We like to take a photo of them and let them run as the screen-saver on the computer.  That way we can still "see" them even though we can't "keep" them.

*  A pizza box (for each child) also works great for storing large art pieces.
Good luck taming the paper monster with {this little project}!


p.s. we have usually fit about 9 months of work in a regular binder, but you could always use a bigger binder if you need to!
LinkWithin Related Stories Widget for Blogs Add to Technorati Favorites Share/Save/Bookmark