Friday Favorites and Freebies

Here's a freebie for you from my summer photo stash.  We were at the beach this past weekend and someone had left this message in the sand.  I thought it would make a great starting photo for our summer collection.  If you think it would fit well in yours you are welcome to use it.  A Friday Freebie from me to you :)   (Click on it to see the image full-size.)

This tutorial of how to make a beach collage from shells would go great with the photo too!

Here's an idea for where to keep all those art supplies-fun idea!

Cupcakes and Pretty go together HERE!

Have you heard of Doodle Bread? I LOVE stars-so many possibilities! This is so fun!

Sometimes I dream about how our house will look when we aren't renting anymore.  This site gets me going on all the fun we might have!

Have a Happy Friday, I hope you find something to fit your fancy!

A Store for the Village

We completed more of our village store this week with the grocery store.  I am realizing that we only have one month left here in our summer home-away-from-home and I find myself thinking we have a lot more village to create in just a month.  The store started out looking like this:

These are little bird houses.  My Mom picked these up at Joanne's for me and said they would be perfect for our village.  She was right :)  They are slowing turning into different places in the village.

I used a dremel tool to carve out the back of each house and to cut off the little bird "perch" in the front.  You can tell I don't get much practice with this little tool (I always just borrow one.)
But it turned out to be the perfect size for our village people.

For all the grocery store "products" I cut apart the newspaper ads from the stores and put them on with modge podge (a layer under and a layer over each of the pictures.)  I guess our store is basically wallpapered on! 
The back of the store has the produce, and another side has the snacks.
The inside shows eggs, breads, cheese, milk, juice, etc.  I'm seeing it as a fun way for us to learn about the food pyramid and talk about different kinds of foods and where they come from.  

The "STORE" letters are just to work on word recognition.  Jay glued the scrabble letters onto popsicle sticks. 
You can may be able see that there is also a little carrot garden next to the store.  It adds a little "farmer's market" feel to the grocery store.  The carrots are sewn down so they can't get lost but they can be "picked" from the garden.  
The Store is open for business...
I hope to add some flowers too, and some berries since we picked some of those up too at the farmer's market today.  Hmmm...makes me hungry just thinking about it :) 
If you want to build a village too, feel free to check out past posts about the village and making roads.  It's been a great "open-ended toy" to encourage lots of imagination!

Messages from the Sun

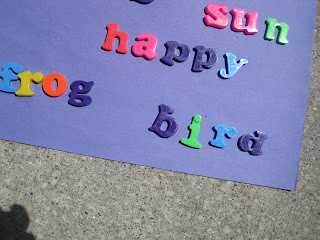
You know those little magnetic letters that end up all over the place?  Well, here is a fun summertime project you can do with them outside that teaches about words and sunshine:
Materials: construction paper, magnetic letters, sunshine, paperweight if it is windy.

To get a message from the sun:
1. Let your child choose words s/he likes and get the letters for them.
Some children like words because they can spell them; like sun or frog.
Others like words because they are meaningful to them; like doll or grandma.
2. Let the child help you form the words on the construction paper in a sunny place.
3.  You may want to use a paperweight.  Our main struggle was the wind with this project.
4. wait....wait...wait...don't touch it for a couple of hours.
5.  Then go out and see what message the sun left!

 When you take off the letters the paper has faded everywhere that the letters were not sitting.

Here's how one of ours turned out (don't be scared away by the bad photo ;)
{This Little Project} was a fun way to explore letters, words, and the sunshine.  Enjoy!

Friday Favorites and Freebies

It's Friday again!  And time to celebrate with some Freebies and Favorites!  I hope you find something to fit your fancy!

Check out this amazing map by Martha. I can't wait to try this out!


Think a spiced-up bike helmet might make it easier to want to wear one?  Check this Modge Podge site out-so many great ideas!

This is a beautiful way to do a light switch cover (and a nice little reminder :)

Have you ever thought about baking cookies in your car?

Craft Fail-seriously Funny. You need that on a Friday, or Monday, or any day. Go have a look.

Have a Happy Project Friday!

Remarkable Marker Fun

Most people think of dry erase markers on just the white board that they come with.  Did you know that dry erase markers work perfectly well on mirrors too?  

Below are 3 more surfaces and activities that are remarkably more fun with these fun little markers.  If you don't trust your little one with dry erase markers washable markers work too :)

Try doing a self-portrait right in front of the mirror.
Kids can make all kinds of expressions in the mirror and then draw them "on themselves."
Mirror writing is also a fun way to write reminders.  It's a great place to display sight words.  We also use it as a place for Spanish words we are learning.  Most families spend some time in front of the mirror.  You can write messages to each other too!

A dry erase marker on a laminated surface can make reviewing something so exciting!  Jay normally might not want to review how to draw each letter.  But with a dry erase marker it is an adventure he won't miss.  (He's using a placemat from the dollar store in this activity.)
 I draw a little dot on each letter so he remembers where to start and then he's off to draw them all-no complaints!  We've also used this technique with maps, etc.

Dry erase markers also work well on windows.   We use window writing to practice writing words.  It's way more exciting on the window then on "normal" paper!  They are great for rainy days too!
Dry erase markers are temporary on these surfaces but they come off easiest if they don't sit for a long time.  Remember to keep the dry erase markers OUT of REACH except for special occasions and to keep a good eye out while they are in use.  If you opt for washable markers (I do with Kay) then just use water to wash them away.
I hope you have fun with This Little Project!

My Laundry Secret Weapon

Today's Tips and Tricks Feature is about my Stainbuster Bag. It's the secret weapon of my laundry room.

Have you ever put something through the washer and meant to check to see if the stain came out...but you forgot and now there is a permanent record to prove that you forgot: a stain melted right to the front of what used to be a cute outfit! It's the worst way for clothes to go from "cute" to "you can only wear it when finger painting or playing in the mud."

Sometimes going through everything in the washer to find "the one" thing you need to check can be such a pain.  It's so easy to forget to do too!

This is my secret weapon to solve that problem: Meet my "Stainbuster Bag."

Most people think this little mesh laundry bag is for things like tights or bras, etc. At my house it gets a lot more use as "The Stainbuster Bag." I try to pre-treat everything that has a stain on it the night it comes off (hopefully) so that it doesn't even make it into the dirty clothes hamper. I try to catch those stained clothes and take them right to the laundry room.  There they wait for a turn in the Stainbuster Bag.

But, the problem is that I've had equal luck with every pre-treat stain remover I use: sometimes the stain comes out on the first wash. Sometimes it doesn't. 

The thing that has changed is that everything that has been pre-treated for a stain in the load  goes into my "Stainbuster Bag."

With this little bag is SO EASY to find and check to see if those stains came out or not. No sifting through all the other clothes to make sure. Now I just look through my Stainbuster Bag. If it comes out clean, into the dryer it goes. If it doesn't, I put a little more stain remover on it and it waits for another turn in the "Stainbuster Bag."

I've saved myself a lot of guilt with this little bag. It was well worth the $1 I spent on it and has saved me a ton of $ in having to replace stained clothing.

Laundry isn't my favorite {Little Project}, but the Stainbuster Bag has improved it!

Friday Favorites and Freebies

I hope you find something to fit your fancy!  Happy Friday :)


Free how-to for an AWESOME outdoor canopy the kids will love!

This little Owl Softie tutorial is great!  I will definitely be making one at the end of the summer when I have my sewing machine again!

And this dress re-fashion is to die for!  Check it out if you have little girls (or like to sew for them :)

If you are the DIY kind (you're here so we know you like projects :)  Then you need to check out this DIY blog.  I love how all the make-over projects turn out and the great repurposing jobs keep them out of the landfills!  This Office Chair make-over is awesome!

Free chocolate HERE every Friday! It's real too.  I just got a coupon in the mail for a free chocolate bar....yum :)

There are "Hurt" craft books are up for sale here. They go up for sale cheap because they can't sell them to retailers (damage is usually very minimal) Go check it out for some great deals.

I've always LOVED making cupcakes, so I can't wait to make these Hamburger cupcakes!

How about Christmas in July? Go check out all the great advent calendars going up HERE!  I LOVE advent calendars!

Enjoy your weekend!

Happy Clouds

Back before I had kids I owned a dance studio for 13 years.  The smiley face was our mascot and we always had plenty on hand at competitions and performances to remind the dancers to smile.  Sometimes they looked so nervous or were concentrating so hard that you couldn't really tell if they even liked to dance!
 These little smiley guys reminded us all that we were having FUN :)

The movie project below is really amazing and brought back so many memories....some of those memories are about when I actually got some exercise!

If you need a smile, this should help:

found via Poppytalk

Wouldn't you just love to walk around underneath Happy Clouds?
Have a Happy {Little Project} Day!

Violins for Little People


This is Jay holding his cardboard box violin.
A lot of our projects have to do with music and I thought I would share this one with you.  I graduated in Piano Performance and Pedagogy and I also played the violin growing up.  At our house we believe that little people can do big, wonderful things.  We love music around here and the fact that there are students coming for lessons everyday at our house means my kids think that music lessons are something that everyone does; so normal.

While I have been teaching music and piano lessons to Jay since he was 2, we decided that it is time for him to start violin lessons.  He tries to play the violin with any 2 sticks he can find.  The photo above is of him with his box violin that I made from a Rice-a-Roni box (it was the perfect size) and a ruler, covered with orange paper.  

The foot positions he is standing on are crayon traced on a brown paper bag.  He loves it!  He feels so big holding it and practicing the things he knows.  He really loves making music and is so excited....

Because this past weekend we picked up his 1/16 size violin.  That's the size our little 3-year-old-boy fits.  It seriously looks like a toy (to me) because it's so tiny.  After we picked it up he told me, "Mom, the violin is my favorite."  I'm sure I will remind him that he said that one of these days when he would rather not practice :)  But for now, he is mesmerized by the idea of learning to play!  

We drove 2 hours to go pick it up.  Jay wouldn't put it down.  He had to hold his violin all the way home. It's only 2 hours...
Do you have any tiny musicians in your family or circle of friends?  I would love any tips :)  I am excited to start this journey with Jay.  He is already telling Kay that when she is bigger he will share his violin with her.  Such a nice big brother he is!

I just ordered this book: 


And this book:
   
to get us started, since I will be his teacher for now.
They came highly recommended to me and I will review it on my other blog, in case you would like the details.  I'm never sure who all stops by, so if you would be interested in learning about what we are doing with music on a basic level so you can do more with your kids at home do a shout-out and leave a comment below.  I would be happy to share more of our music project fun with you!

Wish me luck-this tiny violin stuff is all new to me!

Organize the Bathtub Clutter

Tuesday Tips and Tricks Feature: How to Organize the Bathtub Clutter (for cheap!)

If you have little ones at your house then you either hate or love bath time.  The thing I struggle most with is the after-bath clean-up.  No more.
My favorite bathtub accessory is this plastic colander:Why?  

It's a fun bath toy :)
It was $2.50 at Target {yes!}
It holds all of our bath toys (really, it can hold a lot!)
I can leave it in the tub for a few minutes and the water drains off the toys and out those little drain holes and...

Wahoo!
Toys Stored, doubles as a toy, I feel organized, and no husband stepping on bath toys in the morning!
Lots of happy smiles around here :)

Friday Favorites and Freebies

It's Friday! Time for some fun favorites and freebies. I hope you find something that fits your fancy!

Take a look at this amazing Dragon cake!

Scrabble Game that you can customize as a sight word game for your child.

How to make a cute garbage bag for the car via one pretty thing

Snap, Crackle, Pop rocks cookies...yum!

We all want to live greener.  Here is a great website for crafting green.

Crochet Today has a new site with lots of free patterns to check out.

Have a Fabulous Friday!

A Farm in the Village


It seems like it's been awhile since I've posted about our village.  Be assured that it is still flourishing and providing lots of imaginative play...I've just been out of town a lot lately.  The latest addition to the village is our farm.  

It started with the Village Park some wooden animals and a little red tractor.  Then we made and painted a little barn and added a tree and a robin (per Jay's request :)

The the librarian came over to take a look at the ducks in the pond with Jay.

And Kay found her favorite little piggy.

Grandpa and Jay heard some noise in the barn (made from recycled wood pieces).

It was a party in the barn and the Librarian wanted to in!

Some plastic animals came by to practice their reading skills.

Things got a little out of hand with the barn party.

But things got picked up pretty quick and everyone is back to work again!
We are still loving how versatile the village is.  There are so many stories to tell!


p.s. here are the links to the other places in our Village so far...
Swimming pool, Park, Library, Post Office
How to Make Your Wooden and Peg People
The Construction Site
and Stop and Go in the Village .

It's Your Turn. What is Your Project of the Week?

You know that great feeling you have when you create and finish a project? Well, now is your chance to link in and share YOUR ideas and CELEBRATE completing a project (because that is half the fun :) I know that there are a ton of you out there that have great projects that you are just waiting to share.

And a "project" isn't just a craft so you can blog about your gardening, cleaning, learning activity, recipe you tried, book you read, etc.

Each Wednesday the "Project of the Week" Meme will go up here at This Little Project so you can do a blog entry on your blog and link in here to share your Project of the Week. I will put Mr. Linky up on Wednesday and he will stay up through Sunday night. Just paste the address of your blog post into Mr. Linky (not just your blog address). Mr. Linky will be up each Wednesday so you can post and share YOUR Project of the Week :)

I've been wanting to do this for a while, and finally got it all together! Get ready to inspire and be inspired by FUN
project people just like YOU! Come link in and share Your Little Project!

Be sure to add a link to This Little Project from your blog so your friends will know how to come and share their Project of the Week too! Let me know if you have any questions about how to participate. I hope you will join in!


How to make your Home Art Gallery

Tuesday Tips and Tricks Feature: How to make an in-home Art Gallery

I've been trying to think of an easy way to afford and display some fine art in our home.  I want it to revolve so that we have new works to see frequently and still be reminded of past works.

 The answer for us?  An art book that covers quite a bit of art history.

The other tool? A "cookbook" holder.  Yup, it's not in my kitchen, it's in my front room next to the big beautiful black beast-aka the piano-holding our book open to the art for the day.
It's an easy way to be inspired and learn something new each day.  
I'm a fan of those words: Easy. Inspired. Learn.

If you have little artists that live at your house, you will want to check out the Peanut Gallery from the archives too :)

LinkWithin Related Stories Widget for Blogs Add to Technorati Favorites Share/Save/Bookmark