Showing posts with label winter. Show all posts

Sewing for Baby: Car Seat Canopy and Baby Sling

We're still waiting for our {little} one to arrive and I have been having so much fun sewing for him.  Maybe because it's a {little project} I can do sitting down!

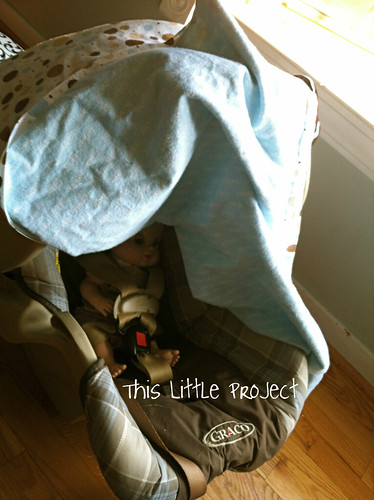
This past week I made a car seat canopy.  This is an upcycling {little project} I've made before, but gave it away last time.

With a winter baby, a car seat canopy is almost a must-have.


I upcycled this time too: the brown rings at the top are from a discarded pair of pants and the buttons are from another {little project} too.  I love upcycling!  And I have a few more {little projects} in the works to share with you for Christmas that use upcycling :)


I followed these instructions to make {this little} car seat canopy.  They worked great, except that the canopy dragged a little on the front corners.  To solve it, I tacked them up just a little on each side.  I think it still looks fine (see photo at top too).

Here's a peek inside.  Ellie has had her dolls in it constantly!


I also made a couple of baby slings this week in the hopes of avoiding carpel tunnel this time from holding baby constantly. 
 mamasmilk.com

I used these instructions and a cotton/lycra blend for the fabric because these photos of a snugly newborn looked so comfy. (I did alter the measurements due to the stretchiness).  

I made a couple of extra slings for the kids to use too.  I know Ellie will especially love using hers with her baby dolls!  She is such a {little} mother!

Both of these {little projects} are easy enough for a beginner.  In fact, using the cotton/lycra fabric meant I didn't even have to hem the baby sling-yay!

Just counting down now for our {little} guy to arrive and try them out :)

Invention Box: Snowmen!

I was looking at our Invention Box the other day and decided we needed to do a {Little Project} because it was starting to overflow! 
Little Ellie is loving her baby puffs right now and I couldn't toss these when they had such a fun "snowman" shape!  So I came up with these snow men for Jay and Kay to make.  

So {This Little Project} all started with these 3 things from the Invention box:

To make {This Little Project} you need:
"Puffs" container-we used one of each brand, but the Meijer brand actually has more of a "three snow-ball shape."

scissors

1 toilet paper roll (for the hat)

chenille stem (for the arms)

permanent markers

felt (for scarf)

tape


1- Unwrap the plastic on the puffs containers and draw your snowman face on.

2- cut your toilet paper roll 2" high for the hat

3- trace the circle of the toilet paper tube and cut it for the top of the hat.  Tape it on.  Double sided tape works best for attaching this part of the hat to the top of the lid.
4- I used scissors to punch a little hole on each side for the arms.  A drill would work too.  

5- Cut the chenille stem in half and put thread one piece for each side.  Bend the arm part inside down so that it won't slide back out.

6- Tie the scarf on (I cut a thin piece about 10 inches long)


And there you go-a fun {Little Project}!  But be careful about taking your eye of your little one while they have markers-Miss Kay went a little crazy-though she loves how it looks :)


Freezing Bubbles!

My friend Chris called me this morning to say she was outside blowing bubbles. It is -1 degrees. So the bubbles were freezing! I had to try it with my little guy. So we went out for some bubble blowing in all our winter attire. Our best frozen bubbles happened when they landed on the snow without popping.

Here is a frozen bubble. It just stayed this way without popping...it is probably still out there like this. But we only lasted about 5 minutes in the cold.

It is a great winter experience and a fun Little Project! Enjoy!

LinkWithin Related Stories Widget for Blogs Add to Technorati Favorites Share/Save/Bookmark