How to Make Doll Diapers: Upcycling {Handmade Holidays}

 
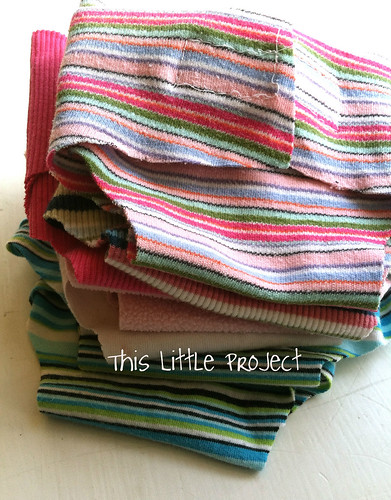
With baby M arriving any day I've tried to be ahead on Christmas presents this year.  Handmade gifts are still some of my favorites.  This year I made Ellie and Kay a batch of diapers for their dolls.  This is a gift they will get before Christmas though because Ellie will be all over our {little} newborn otherwise!
 
Here are a few of the doll diapers:
I love how they turned out and had a lot of fun choosing the colors out.
 
 I used these instructions to make them.  Only I didn't use felt.  
 
Felt + velcro is NOT a great combination.  Your velcro will stick to every part of a felt diaper.  BUT, felt has 2 great qualities: it's inexpensive and you don't need to deal with the edges fraying.

I didn't want to use felt so I found 
something with those same 2 great qualities:
  old T-shirts!
That's right: they don't cost anything and T-shirt material doesn't fray!
Yay for upcycling!

Another bonus: fun patterns on the diapers :)

I also altered the pattern by cutting 1/2 inch off of each of these 4 sides.  The diapers were just a little too big for our dolls.
 
 Here's how they turned out:  This one is cut from my old polar fleece shirt.

 
One other alteration I made: COLORED velcro!
When I went to buy some velcro I found all of these colored choices in the "value buy" bins at Joanne's.  It was less than $1 for 2 feet of each color. I love the pink, red, blue, and white--it gives them some added flare :)
 

Other than putting the velcro on, I didn't do any sewing for {this little project}.  
 
I also cut some {little} wipes out from an old white t-shirt to go with the diapers. 


It almost makes changing a diaper look fun, huh?


Sewing for Baby: Car Seat Canopy and Baby Sling

We're still waiting for our {little} one to arrive and I have been having so much fun sewing for him.  Maybe because it's a {little project} I can do sitting down!

This past week I made a car seat canopy.  This is an upcycling {little project} I've made before, but gave it away last time.

With a winter baby, a car seat canopy is almost a must-have.


I upcycled this time too: the brown rings at the top are from a discarded pair of pants and the buttons are from another {little project} too.  I love upcycling!  And I have a few more {little projects} in the works to share with you for Christmas that use upcycling :)


I followed these instructions to make {this little} car seat canopy.  They worked great, except that the canopy dragged a little on the front corners.  To solve it, I tacked them up just a little on each side.  I think it still looks fine (see photo at top too).

Here's a peek inside.  Ellie has had her dolls in it constantly!


I also made a couple of baby slings this week in the hopes of avoiding carpel tunnel this time from holding baby constantly. 
 mamasmilk.com

I used these instructions and a cotton/lycra blend for the fabric because these photos of a snugly newborn looked so comfy. (I did alter the measurements due to the stretchiness).  

I made a couple of extra slings for the kids to use too.  I know Ellie will especially love using hers with her baby dolls!  She is such a {little} mother!

Both of these {little projects} are easy enough for a beginner.  In fact, using the cotton/lycra fabric meant I didn't even have to hem the baby sling-yay!

Just counting down now for our {little} guy to arrive and try them out :)
Thanksgiving Blessing Mix Printable


I've shared our family's favorite Blessing Mix before. It's a treat we love to give to family and friends. This year I made a printable to go with it. 

 I finished {this little project} weeks ago but with all our baby preparations and being on partial bed rest I haven't shared it here. 
 Luckily, we can be thankful all year long :) 
 

 Below are files in color and black and white of the Thanksgiving Mix Printable: Thanksgiving Blessing Mix Printable 
B&W Thanksgiving Blessing Mix Printable 
Wishing you and your family a WONDERFUL Thanksgiving! 

How to Make a {little} Tie Onesie


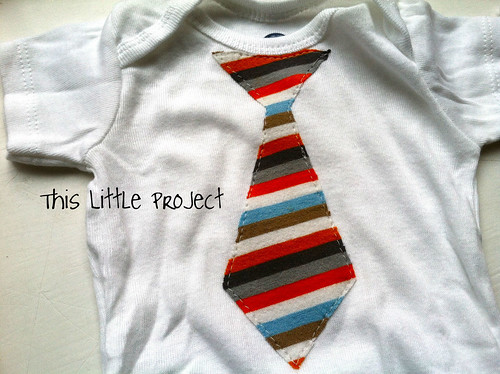
With Baby M making his appearance sometime in the coming month, I have been sewing a bunch of {little} things for him.  {This little project} is a tie onesie for him to wear to church.  

I made a few--not because there are triplets coming or that he needs that many--but because 3 of my sister-in-laws are having boys too!  It's going to be fun to have a big pack of boy cousins the same age!  


Which brings me to another point: these {little} shirts make great gifts!  And they really are a {little project} so you will be able to whip them out fast!
 
How to make {this little project}
 You need:
Steam-a-seam or Heat and bond (an iron-on material)
fabric for tie
onesie (or shirt)
iron
needle/thread/sewing machine (optional)

1- I cut a piece of paper in half and cut a tie shape (I just eye balled it).  Then unfolded it.  That way both sides are the same. I cut a little round part out of the very top so it would go around the rounded neck nicely.
 
2- use your paper pattern to cut the tie shape from your  fabric.  {this little project} was repurposed from a T-shirt!  The knit fabric from a T-shirt doesn't fray and is soft for baby.  
 
 
3- Put your cut out fabric tie on one of the sticky sides of your iron-on material (I used steam-a-seam).  It should also be sticky on the other side so you can iron it on but don't pull the paper off on that side until you cut out the tie pattern.
 
4- Cut around the tie pattern.
 
5- Pull the back paper off and place your cut-out tie/iron-on onto your onesie and iron on according to package directions.
 
6- You can be done there, or you can stitch around the tie.  I always stitch around it because I like the finished look it gives and it makes the ironed-on part look nice for longer (through multiple washes).

 
Now go dress up your handsome {little} guy!

After-Halloween Math

This is what it looked like at our house after everyone brought home their trick-or-treating loot.

It's waaaay too much candy.  So our tradition is that the first thing we do is take 5 favorites out and dump the rest of everyone's candy into a bowl and sort it by color.
The kids record the number of each color on each colored paper.  My kids had two nights of trick-or-treating so we did this twice-recording the second number on the underside.

Then we compared by graphing all the colors from one night to the graph the kids made of the second night.  The graph happens the day after, of course.  For the record, the first night had more candy overall.

{little} Ellie also sorted the candies by size and shape later on (no photo).  I love using something that they care about to do learning games with.  Finishing with a treat is the part that they love! 
But my favorite part of {this little project} is that since everyone's candy is in one bowl it isn't really anyone's.  So it lasts a lot longer and no one eats too much.  We were just finishing last year's bowl when it was time to refill it for this year!

Zoobooks Magazine Deal NOW!

There is a great magazine called, Zoobooks that introduces kids to the wonders of nature and teaches them about the world around them.  Right now on Groupon there is a great deal on them: $10 for a year subscription (instead of $30)!
  • Cloned_image32571-0_grid_6_grid_6
There is also one called Zootles and Zoobies for younger kids.  These are great and the price is fantastic!  You can also purchase a 2 year discounted rate too!

Use this link and then click on "Goods."  Scroll down and you will see the Zoobooks there.

We love these!
 
LinkWithin Related Stories Widget for Blogs Add to Technorati Favorites Share/Save/Bookmark