Time Capsule and More New Year Fun!


Ready or not, the new year is almost here!  We have some traditions from the past that I've shared before.  This year we are going to be making a Family Time Capsule during our {little} party as part of Family Night, since today is a Monday too :)

Any container can work for a family time capsule.  An empty paint can is easy to seal and open again and you can find them at Home Depot or Lowes in the paint section.  
 
I made this to go on the front, and I think we'll have everyone sign their name on the outside too.
Family Time Capsule 
 
I also made these "All About Me" sheets that we will fill out--with info and predictions about the next 5 years.  Everyone will put a couple of small things and some photos inside too.
 
It will be fun to see how much we've changed and what predictions come true when we open it in 5 years on New Years Eve! 
 
You can use these for your family too!

New Year's Time Capsule


We will also be using these bags to count down to the new year.  In each bag I have an activity or paper that tells us what to do to for each hour of the night (game, movie, treat, hat making, etc.) as we count down.  Kay has been practicing telling time so she's been my helper on making these.

new years eve countdown bags 4wm


I love this packet from TpT (free) for the kids to do.  
It's one of our school activities this week
2013 New Year's Poem and Writing Activity

And this one too from TpT (free).  
I'm excited to talk about goals and think about their future with them!
2013 New Year Creative Writing Activities {FREE}

And New Years isn't complete without some New Year Resolutions!  I love this printable (free here) for the kids.


New Year Resolutions Kid Printable 2013

And this one for adults.

New Year Resolutions for YOU!

My one {little} word this year is: simple. 

I read this book this year: Organized Simplicity


And have been inspired by so many wonderful ideas in it.  I highly recommend it! 

This year I want to find more joy and fullness of life through living in the beauty of simplicity.


I'm excited!

Happy New Year!!


O Come Let Us Adore Him!

This year is our first year with the {Little} People Christmas Nativity Playset and our {little} ones (especially Ellie) have really enjoyed it.  
I have to admit that the best part for me has been watching them interact with it.

The other day I came in to find this scene:
 

It looks like the wise men took a couple of cars today, instead of camels to see the Christ child.

It made me think.  How do we come to Him?  And how can we see Him more in the everyday?

I'm sitting here holding my brand new baby boy and thinking and pondering on so many blessings.  It's a special blessing to have a brand new baby boy at this time of year.


There's a very real chance to think about another baby boy born in a manger so long ago and yet so real now.  And that baby being born means everything to you because He made it possible for you to hold your baby boy forever.  That miracle is so precious to me.

And I've been witnessing my children adore Him as they talk about Christmas and what it really means.
  
This month we are learning about Sacrifice: the giving up of something important to you for something even better.  
Our {little} ones earn plastic coins for doing their responsibilities each week and usually these coins can be traded for things in our "treasure box" at the end of the week (more about that {little project} later.)  

But in December we decided to use them to "buy" toys for kids who don't have them.


It's been a challenge for the kids to buy things out of the box for someone else when it is a toy they would like to have themselves.  At first they didn't want to spend any coins.  Then Jay saw Kay start to spend her coins to buy the toys until hers were all gone.  Her generosity inspired him.  He started giving up his coins to get toys for other kids too.  Until his coins were all gone.  Then he said to me, "Mom, I sacrificed all that I had!"
O come let us adore Him! 
A little boy and little girl who understand what a sacrifice is and that it feels good to do something for someone else.  It has made this year a different kind of Merry Christmas.  A Christmas that is more real.

And all the while, I've been watching them adore our {little} baby M.


Jay asked me if he could play the violin for him.   And I watched, knowing that He is looking on, pleased.

And my boy who is in love with every creature that He made brought a butterfly to baby M so he could hold the {little} treasure too.


This {little} butterfly is a winter miracle.  

Jay brought some caterpillars inside this fall and two escaped their container and made their chrysalis inside our house without us knowing.  We discovered two butterflies flying around the kitchen in the middle of the winter!  

A butterfly miracle.  In our own home.
A perfect reminder of the change that His life makes possible for us 
as we learn to be like Him.

 
It doesn't matter "how" we come to him--whether it's on a camelor walking with sheep,
or in a car,


or with new wings,
or with some plastic coins and toys that are for someone else.

It only matters that we find Him.
Everyday.  In the everyday.

My {little} ones are finding Him.  And showing me.

Having a newborn at Christmastime has meant slowing down.  
The kind of slowing down that leaves time to think about Him while I take care of my own baby boy.

 And a {little} child shall lead them.... O come let us adore Him!

But Jesus said, Suffer little children, and forbid them not, to come unto me: for of such is the kingdom of heaven.  ~Matthew 19:14


Enjoy these wonderful Bible videos.
Wishing you a Merry Christmas!!


Play Doctor Kit for Kids {Handmade Holidays}

 
This doll has an owie--with a doll-sized bandaid on it.  

I can't wait to watch Jay, Kay and Ellie with these {little} bandaids and the rest of the play Doctor kit that I've been working on for Christmas.

I made people sized and doll/stuffed animal-sized bandages.  Everyone has the chance to be healed.

To make {this little project}
I used a white cotton/lycra fabric so there is plenty of stretch in the bandaids. 
 It makes them more of a one size fits all.


I sewed velcro to the ends and used a brown fabric marker for the middle.  I started with red velcro but it looked too much like an owie and I switched to white.

Really, these aren't anything special and I wondered if the kids would even know what they were.  But somehow Ellie got a peek when I was making them and asked if they were bandaids.  
So I guess they look close enough, lol.

I think I might make some colored ones too--you know, like the princess and ballerina and star wars ones we have up in the closet!


The rolled bandages are from the bottom of a white T-shirt.  I just cut off about 3 inches from the bottom of the shirt, chopped it into a couple of strips, and sewed some velcro to the ends.  The kids will come up with a fun way to use them, I'm sure.


Playing doctor will be so much more fun!

And the bonus is the chance we will have to talk about the Great Healer that we celebrate at this special time of year.  


 click here for more handmade gift ideas!

How to Upcycle Baby Clothes to Doll Clothes {Handmade Holidays}

I'm a big fan of quick {little} projects.  Those are the ones I actually get done :)
 
With our new {little} baby M's arrival, babies are getting a lot more attention around here!
 
So, I made some doll clothes for my girlies for Christmas.  

 
Not from scratch.  That would take waaay too long!
I'll just share a couple of quick {little} ideas:

We have two of these dolls--so I took a baby skirt (3-6 months) and cut it in half and sewed the new edges together.


Ta Da!  Matching skirts!

For most re-sizing it helps to start with dresses/shirts that don't have sleeves.  It's less work and you end up with sleeves simply because you are starting with something that is too big.

 To make the neck smaller and to shortened the top at the same time,  I take a new seam across the tops of the shoulders.  This also makes the arm holes smaller.


After the top is fixed with those 2 shoulder seams, I take in the side seams.  If the arm holes are still too big I start there to take it in.  I literally just make a new seam starting at the arm and go all the way down the dress or shirt sides. 

So with 2 shoulder seam and 2 side seam changes (with arms as needed) we have a whole new size of outfit!

You can see the seams better in the dress on the left.  They may not be totally perfect.  But the dolls don't seem to mind :)


The hat above was made by taking the extra from both sides and stitching it together and knotting the top--a bonus!


This dress and pants were made from a romper.  I cut it in half!
I hemmed the dress at the bottom of the pocket and added elastic to the top of the new pants!

Another bonus!

 These {little} outfits work perfectly with the {little} doll diapers too (which was another fun upcycling project!)


 I love that upcycling means I don't have to spend a penny and we get to use something again! 
The girls love it too!


click here for more handmade fun!

Spiked Granola, ipad apps, and T-rex's Sleigh

  Remember my favorite granola recipe?  Well, Hubby found a way to make it even yummier.  
He spiked it.....with brownies!!
 

I didn't know that this granola could get any better.  But chocolate is just the thing!

 With baby M making his debut recently, the kids seem to be finding more time on the ipad.  
I would love to share all of our favorite educational apps sometime (but I'm currently snuggling with baby M and typing one-handed, so not today.)

Ellie is playing Junior Bingo.  
I also love the Math Bingo and Word Bingo by the same company for Jay and Kay.


For android users: Math BINGO


I woke up one morning to find this note slipped under my door from Jay.
He's determined to make snow ice cream.   Have you ever tried it?  I promised we would...


 My kids came home from a friend's house with these cute sled ornaments they made from popsicle sticks.  Ours never made it on the tree....


I must say that watching children play is one the greatest privileges I have as a mother.


And so is this!


*Disclosure: I am an Amazon Affiliate, which means if you purchase the android app I get a couple of pennies to put towards future app fun at our house.  My kids love you for that :)  All opinions are my own.

DIY Nativity Costumes: DONKEY and CAMEL

I have been working on Nativity Costumes for our family over the past three years.  Each year we have one or two more "official costumes" instead of just whatever we can find to make it work. 
The Nativity is what Christmas is all about for our family.  Each year we read the story as a family and act it out with the kids at least once.   It's a Christmas Eve tradition.
 
 All of the costumes are a EASY to make but I find that I don't have time to make them all during such a busy time of year.  So I am pacing myself and in another year or so we'll have a nice set ;)

  And since this is what Christmas is about for us, it's worth it to me to make the effort to make the costumes for us to use each year.  
Plus, the kids LOVE IT!

This past year I added a donkey costume and a camel costume.  

I try to make the costumes work for a variety of sizes.  Our little ones will grow up :)  
Plus, sometimes we switch up parts and Mom and Dad wear it instead of the kids.

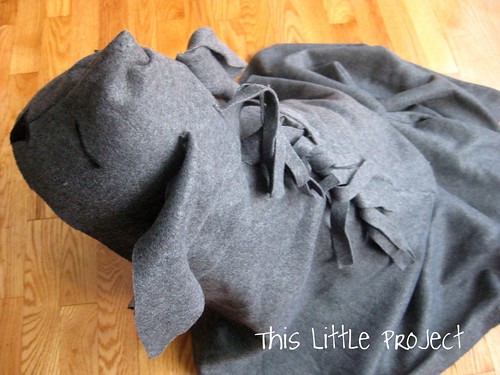
Here is the Donkey Costume:


I made it in the same way that I made the sheep costumes the year before

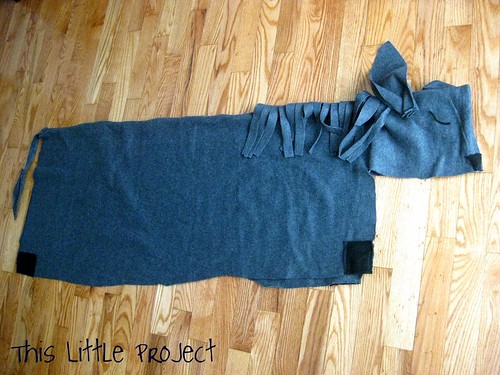
There is very little sewing to these costumes, so a beginner can easily make them.  I like using fleece so I don't have to hem anything.  The body of the donkey is one big rectangle piece.  The head is a rectangle of fleece sewn to the middle of the body.  I sewed some ears on each side and a mane and tail to the middle of the "back" of the donkey.  

Then I just used some black felt for feet, eyes, and a nose.  

I was actually just using scraps from another {little project} for the donkey, which is why it's not straight across the bottom ;)


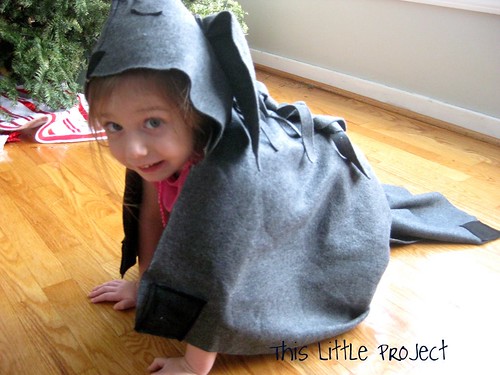
Kay when she was 4 years old.

For the camel I used the same idea, just different colored fleece.  You can stuff something inside the back for the hump(s).  


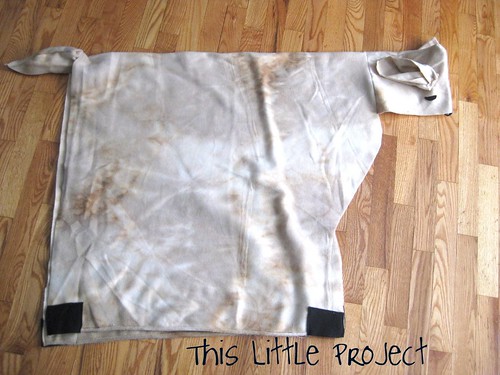
I love how versatile this pattern is.  Not to mention how cute everyone looks in them!  
Well be able to use them for years to come :)

 
Wishing you a wonderful Christmas!


click here fore more handmade fun!
LinkWithin Related Stories Widget for Blogs Add to Technorati Favorites Share/Save/Bookmark