Project: Softies

I am in the mood to make a little softie.  I am fairly new to all this softie fun, having only made a couple of them.  I think they could be addicting!  Are you wondering what a softie is?  A handmade little friend is my best answer.  My kiddos LOVE holding little friends and the only problem now is deciding WHICH one to do...did I mention that the patterns and tutorials are available for all of these creations for FREE thanks to very talented and generous people?  So much fun to have and so little time!

This one has some chick attitude:


This one is easy to find supplies for-isn't he cute!:


Kay loves "neighs" so she would like this one:


And since I'm a sockaholic, I don't know if I can resist this one!


I loved my little bunny as a child:

These seem so seasonally eggstraordinary:


Everyone loves a monkey:


These are just SO CUTE!


Sheesh!  Good luck deciding on your next Little Project!

TED-Ideas Worth Spreading

I first was introduced to TED by my Dad. This site is incredible and you will want to settle in and look around because there are so many fascinating ideas and things to look at. Here is a neat one I came across today called "Underwater Astonishments."

Have fun exploring this Little Project!

Easter Traditions: secular vs. sacred


Every year about this time I start thinking about our Easter Traditions. Mainly I am doing the secular vs. sacred debate. It happens at Christmas time too. I feel like I am doing a balancing act between the two. There are some fun secular traditions built around the holidays aka: Santa and the easter Bunny. But they aren't real. But Christ IS real. And more important. So the question is how to keep focused on what is real and important while having fun with the secular side too.   It isn't easy, that's for sure.  I considered it somewhat of a triumph that Jay didn't know who Santa was mid-way through December.  Am I weird?

Last year we found a good mix in separating Easter from the easter bunny by doing the easter bunny, egg hunts, coloring eggs, etc. on Saturday. Then Easter Sunday was reserved for Easter-the real reason for Easter: Christ. We attended church and talked about the story then and leading up to Easter. It helped that the candy high had lulled from the day before.  The other thing that has helped is keeping Santa and the easter bunny to a minimum.  No "you better be good for Santa to bring you stuff."  And more, "We will open presents on Jesus' birthday."  And Santa and the easter bunny are minor present givers.  Why should they get all the credit for all the hard work?  Mom and Dad give most of the gifts.

What do you do in your home?  I'm always looking for more ideas on the tradition of a Christ-centered Easter. I added a Mr. Linky below for everyone to share their ideas.  Please feel free to blog about or add a linky to a site with ideas you like too. Then come back and see what treasures of traditions can be found to help celebrate this special day.

UPDATE: I posted a few art projects that are true to the season.  Check them out here.

Art Rocks! Easter Eggs

DSCN9968
This project was a 2-day project because we collected the rocks on our nature walk one day, and painted them the next.  It is an inexpensive art project that was a lot of fun and has a nice tie to Easter-see below.

First, we went to look for egg-shaped rocks. I think kids need sunshine and dirt to grow, at least mine do. So we took our time looking for some, and then came upon this big pile. Bingo.
DSCN9932

Next you need markers and/or paint to make your easter eggs. We used both and they were both fun.
DSCN9961

It's smart to spread newspaper out before you begin :)
DSCN9962

An old pacifier is great for making dots!  A pencil eraser would be good too.
DSCN9965

Then just let them dry outside and add them to your rock garden collection.
DSCN9973
For added Easter significance, talk about the rock that was rolled from the tomb where Christ was. Here are some coloring pages that correspond: LINK, LINK, http://www.sugardoodle.net/sdclipart/wp-content/uploads/2009/03/apr09-14.jpg.

Have a rockin' Little Project day!

Birthday Winner

Guess what I got to make for my birthday? Ice Cream cone cupcakes!!!! Now I know you can use regular cones and cook cupcakes in them....but these are all cupcake and you just frost the "ice cream" part of the cupcake (which you would frost anyway) but here it makes it look like ice cream!!! 

If you are a "muffin mom" too, here is the link for these cute (and inexpensive) cupcake cones makers.

My other favorite cupcake tin is the "mini" one from Pampered Chef. These baby cupcakes are bite size and so the mess is tiny too. Everyone knows that cupcakes are yummy and MESSY when kids eat them. These are the perfect solution to that.

The only downside is that it is VERY easy to eat a ton of them!

The Summers Family is the lucky winner of the Birthday gift of a Peg Family and Cupcake Pincushion (you can thank Jay for choosing you :) Thanks for stopping by to say hello!

Have a Happy cupcake Little Project!

The Counting Train Puzzle

DSCN9912
We are starting to do more math experiences with Jay. One thing that bothers ME (not him) is that there is a certain number that gets skipped when he counts from 10 to 20. The lucky number 14. We are tackling that number with this project. If you have any desire to tackle any kind of counting (by 2's, 5's, 10's, etc.) this could be a fun project for you.

Supplies: cardboard (reuse a cereal box), markers, ruler, scissors, scrapbooking-type scissors.

This project is related to the 
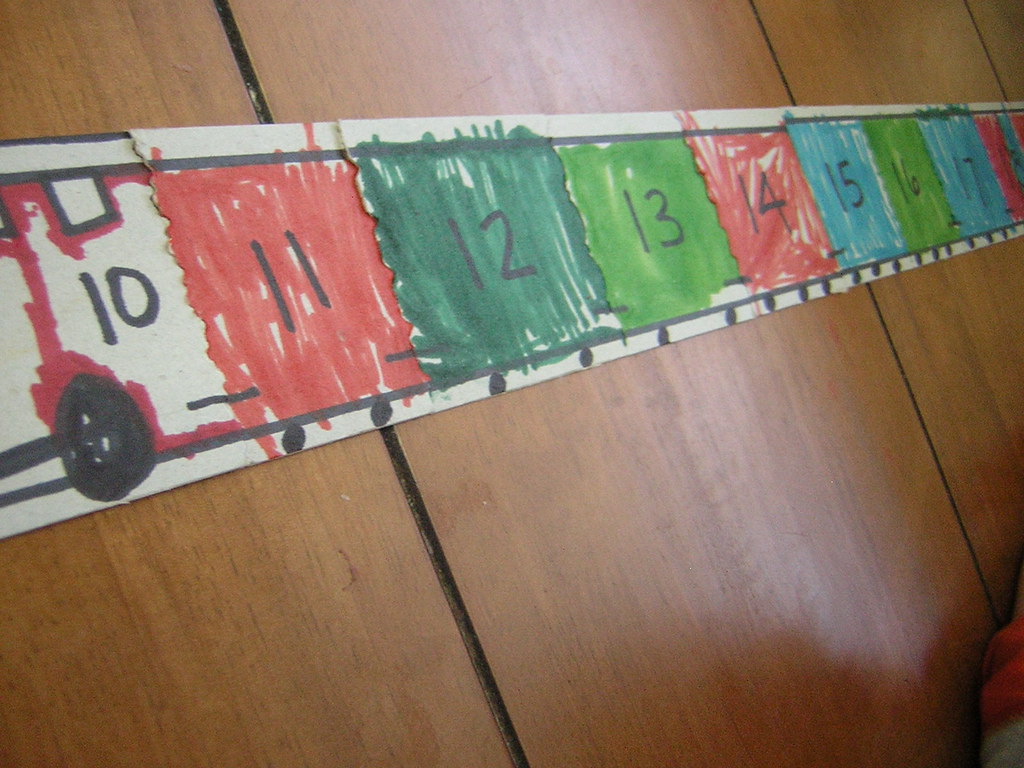
ABC puzzle we made before, but this time I was focused on order. That puzzle focused on matching. Since order is the goal we made a train. Putting the train puzzle together means that all the train cars line up in the CORRECT order.

To make your Train Puzzle:
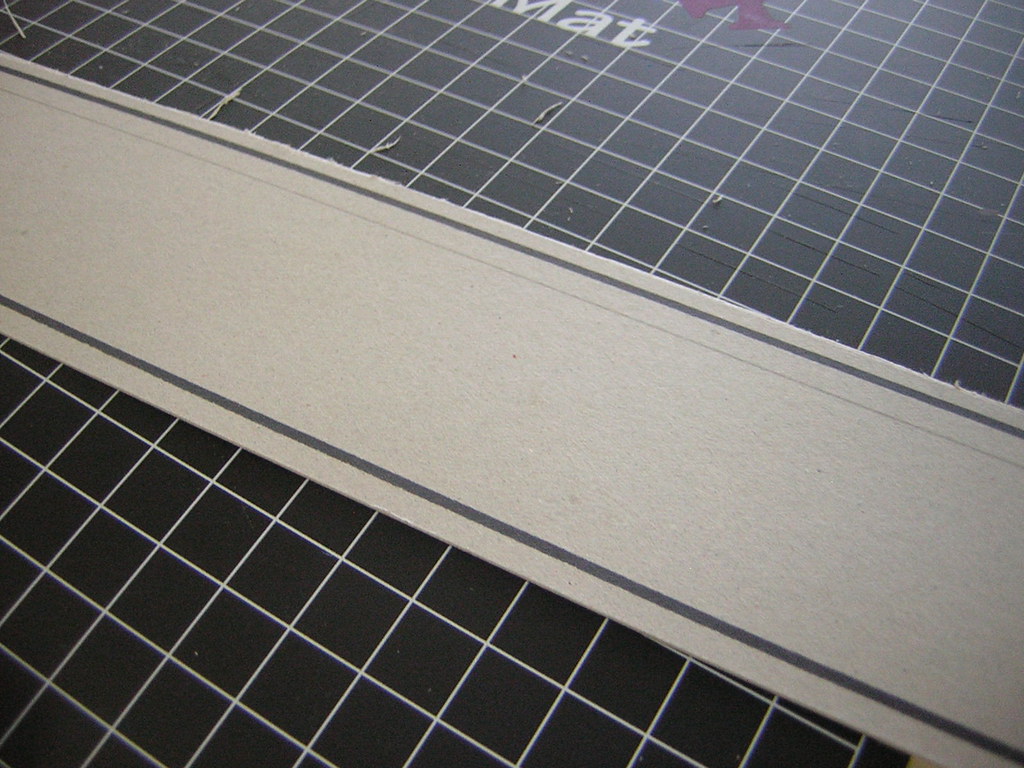
1-cut your cardboard into 2.5" strips.
DSCN9895

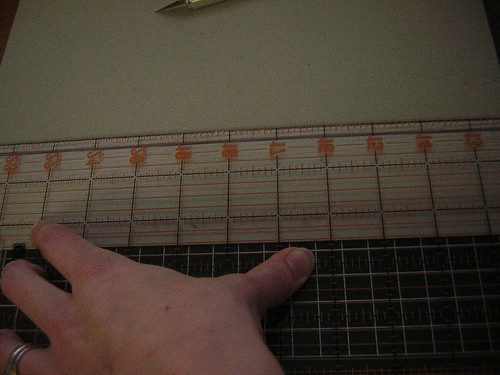
2-measure .25" from each side and draw a line for the top and bottom of each train car.  I also pencilled in a line that I used to marker in the "link" from one train car to the next-see end photo.
DSCN9898

3-mark how long you want each train car to be before you cut (this is to make sure that you end up with the right number of train cars for however you are practicing your counting.)
DSCN9900

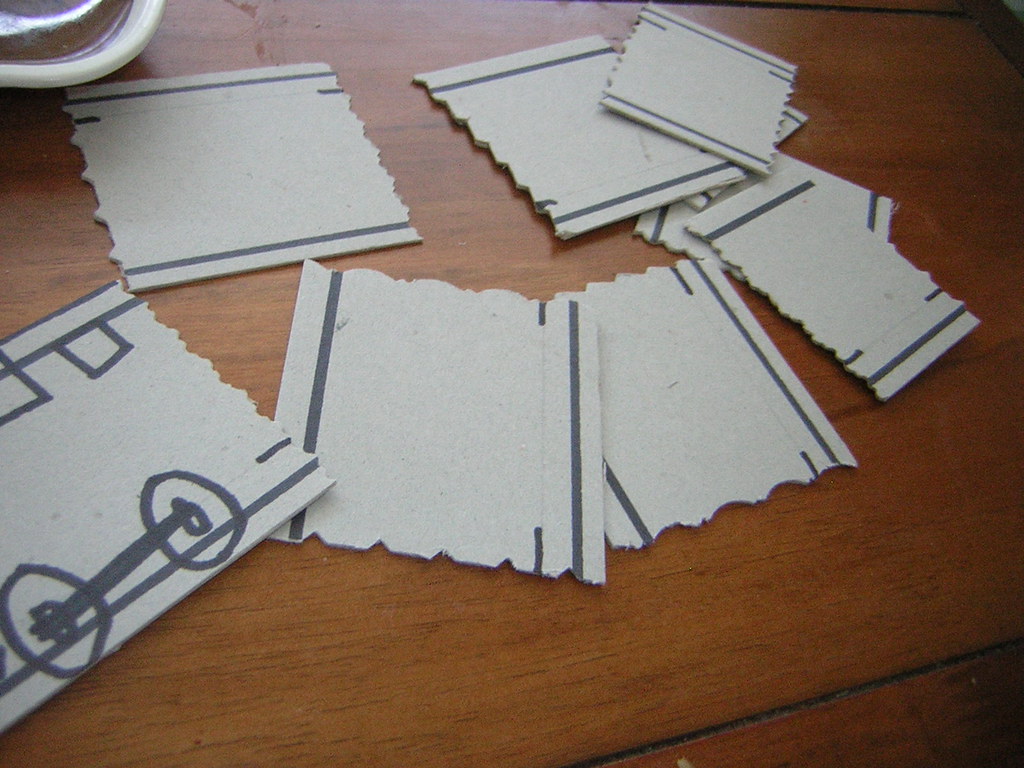
4-Using scrapbooking scissors (the kind with the fancy edges) cut each car out. Alternate the scissor patterns so that you use a DIFFERENT edged scissor on the front and back of each train car.
DSCN9899

5- I wanted Jay to feel like this was HIS puzzle. So after I got the puzzle this far I let him take over. He colored each train car puzzle piece with a different color marker.
DSCN9903
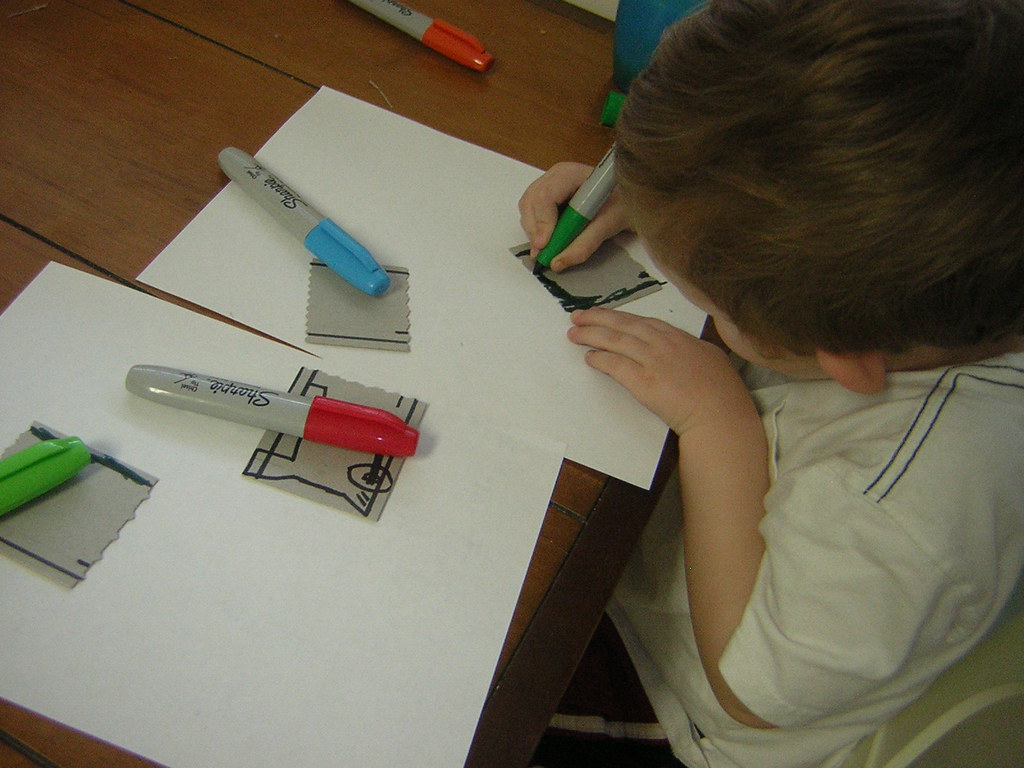
Then we wrote a number on each train car.

And here it is! Now we have a fun (and cheap) way to practice number order.
DSCN9911
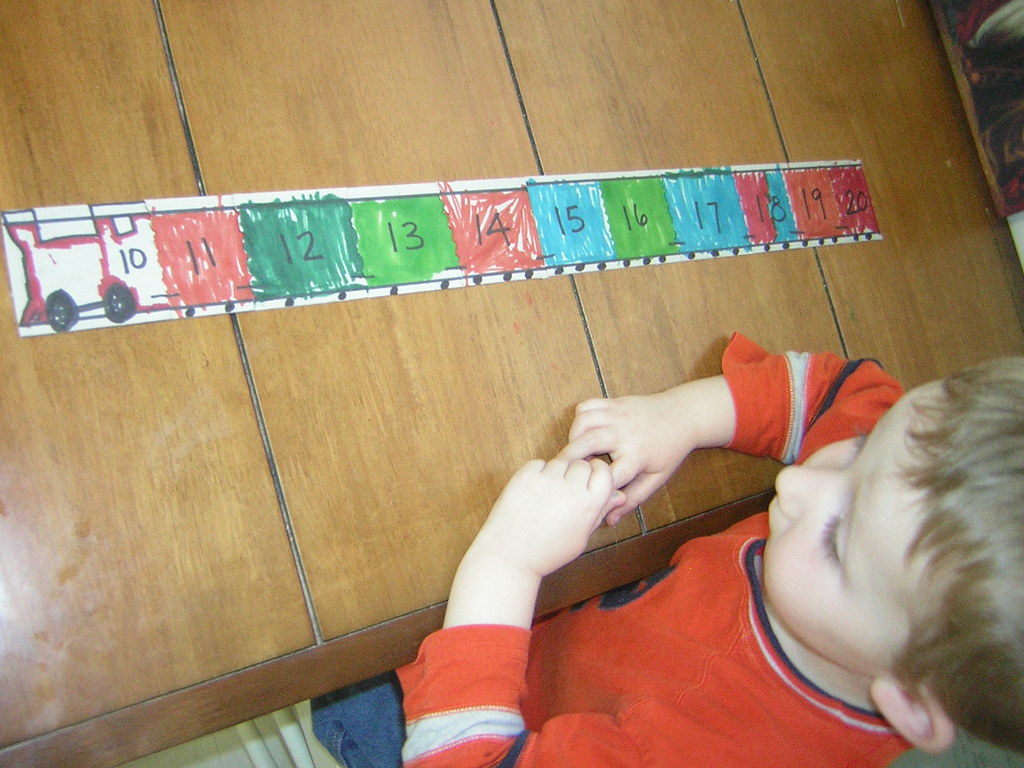
Have a Happy Counting Little Project!

A Happy Birthday Gift!

This little cupcake pincushion has been a fun birthday gift for me to give away. Since today is my birthday, I thought it would be fun to do a little birthday giveaway. Want to pretend it's your birthday? A little cupcake pincushion and peg people family are up for grabs!

Aren't these little people cute! They are so fun for little hands. I've fallen in love with them (see Peggy here) and have a few extras.
Just leave a comment about what traditions you have to celebrate on your birthday. One lucky winner will receive both little gifts!
Comments close on March 26th, so hurry! One rule, don't ask how old I am...I'm just hoping to be "one year older and wiser too"!

My MIL and FIL flew us home for a week-long celebration.  What a treat!  My Mom sent me home with this darling bag that she made for me.  She is sooo talented!

 Yup, she knows I'm a big fan of cupcakes and stars!  If you want the tut, let me know and I'll ask her about it.  The handles are neat because they are different lengths that fold over each other and make it so the bag has a closure on the top.  I do have this tut, to share, that's similar.
UPDATE:  Try these to make your own grab bag-styled bag: Link or Link
(Thanks Mom!)

There are a bunch of variations on the bottle cap pin cushion (the one I call "the cupcake" pincushion).
There is a nice tutorial by How About Orange. And VeryBigJen has a filcker tutorial HERE.

If you would rather wear your pins like a ring on your finger, here is a fun tutorial from kasasa to try out.  I've made them both ways, and they are VERY EASY and FUN!

To add a little Happy Birthday flag, just poke a pin down and up through the side of the paper and stick it in the cupcake pincushion :)

Wishing you a Happy Little Project Day!

Happy Spring!


Today is the first day of spring and we had to celebrate by making these little friends along with a little nest for them. Jay has been WAY into nests lately and Kay LOVES bird watching, so it was the perfect activity for our FIRST spring day (and the weather even cooperated!)

To make your own nest you need: yarn, a balloon, a cup to hold the balloon, elmers glue, and a bowl. {Little Project Tip:}This is an activity for older preschoolers on UP. Kay just wanted to pull it all apart (but she loved playing with the birdies-see below).
Cut the yarn into pieces-ours varied thanks to Jay's help-4-7 inches works :)

Blow up a balloon and put it inside a cup to hold it still. Then dip the yarn pieces in the glue and lay them across the balloon like this:

We made some yarn birdie eggs to go inside by dipping the yarn in the glue and then wrapping it around a finger. This works best with LONG pieces of yarn.

The nest takes about 24 hours to dry completely. My camera ran out of battery before the final product was done. I'll put a photo up later...sorry! HERE IT IS!


To make some birdie friends you need: pom poms (different sizes are fun-the big ones were our favorite), googily eyes, a few colors of felt, a pipe cleaner, and hot glue gun. {Little Project Tip:} This is not an activity for young kids to make, due to the hot glue.  But if they aren't so little that they will eat these little friends, they will love to play with them-mine did for days!
  This is our birdie family:

This photo was before Jay insisted that they have feet, "so they can fly." We had a little bird anatomy lesson after that comment.
I used hot glue to put the googily eyes on.  The wings are just small pieces of felt.  The beak works best if you cut out a diamond piece and put a little hot glue in the middle and close it to look like a beak before you hot glue it on.
To make the feet (see above) you just bend part of the pipe cleaner into an "M" shape to look like 2 feet and then cut the remainder off.  Hot glue under the pom poms.  The pipe cleaners help the birdies stand up better.

Playtime with the birdies-a total success! Watch them fly!


If you don't have a need for a little birds nest at your place, check out this link for how to do the same technique and turn them into baskets.


I also saw these photos on Jordan Ferney and LOVED them and thought of my Dad, Mr. Master Gardner. Our daffodils just bloomed and now I'm looking for tulips! Aren't these fields breathtaking!?


Happy Spring with a Happy Little Project!

LinkWithin Related Stories Widget for Blogs Add to Technorati Favorites Share/Save/Bookmark