Showing posts with label Party. Show all posts

Peace on {Earth Day} Cupcakes

Each year we have an Earth Day party at our house.
Which means that we need cake.  Of course.  


These yummy cupcakes were preceded by a lesson about the creation of the earth (what more persuasive way is there to talk about why we should take care of the earth than to talk about Who made it and Why it's for us?)

  We also made a "creation art project" and "creation party mix" before the cupcakes, which I will have to share on a later post...
 
Inspired by these, we decided to make "Earth" cupcakes for our party.  

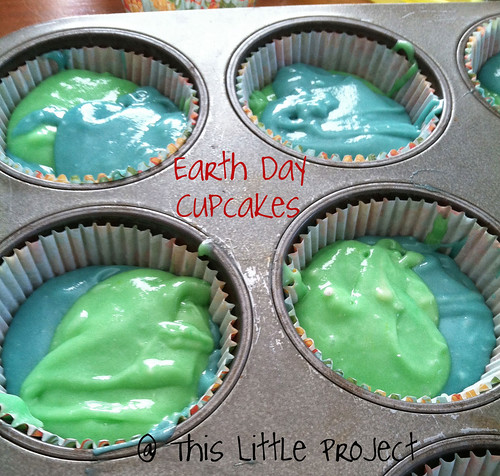
 I started out with a white cake mix (since the kids were helping with {this little project}.  We divided the batter in half and put blue in half and green in half.
 
Then we dolloped each color into cupcake liners.
 
 
 My sweet friend gave me some darling mini cookie cutters as a birthday gift this year and we decided to use them to showcase some of God's creations on the earth.  

First I cut the tops off of the cupcake.
 

Then I frosted the "new top" while the kids cut out a shape from the "muffin" part.

Then we replaced the tops.  One bonus of this method: less frosting all over faces and hands!
 
 
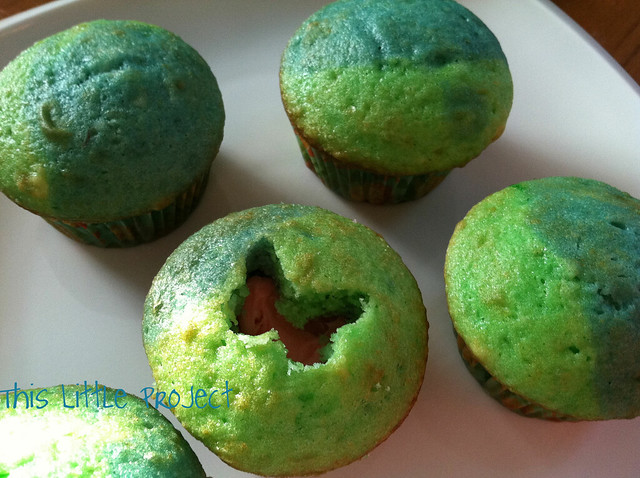
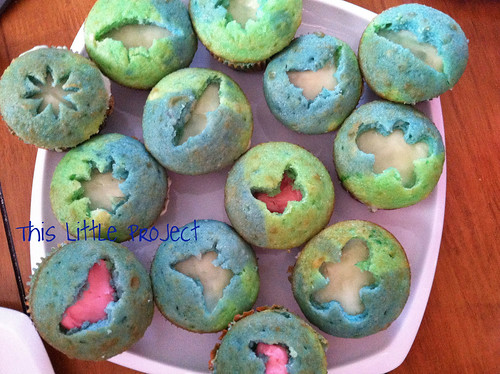
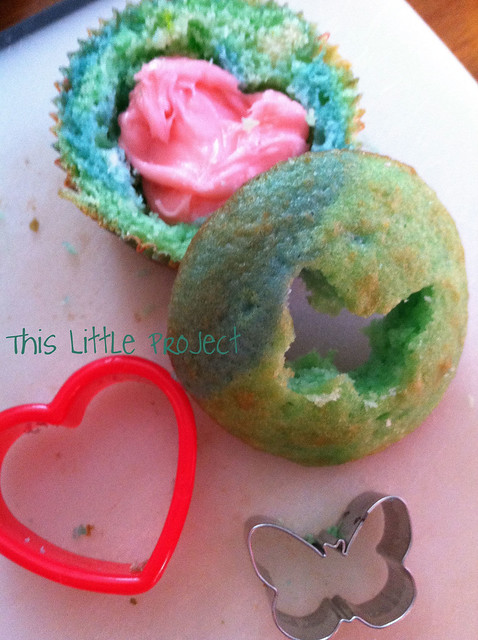
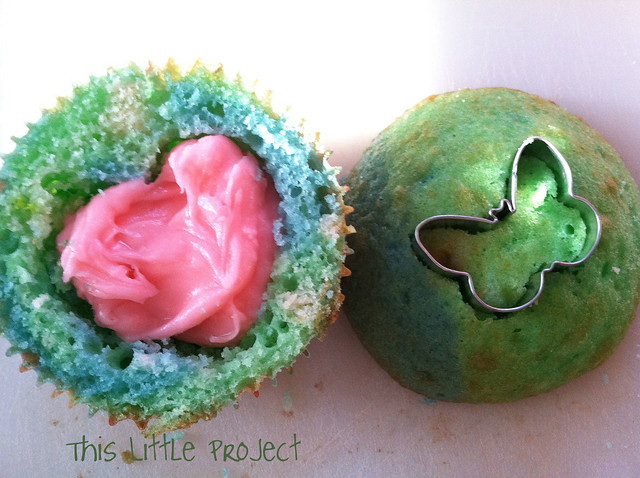
We also tried some where we cut out the inside of the cupcake and filled it with frosting.
 

Loving the Earth is wonderful.  We need to be good stewards of the incredible gift we have been given.

But to me, these cupcakes are more like: "For God so loved the world, that he gave his only begotten Son, that whosoever would believe on Him would not perish, but have everlasting life." (John 3:16)

For whatever reason, Jay and Kay have been fighting/teasing/bothering each other like crazy this week.  One night I named these cupcakes "no-contention cupcakes."  They couldn't have one if they were causing contention.  It got their attention.

The next night (we couldn't eat them all at once!) I called them "Peace on Earth" cupcakes.  And the name stuck.  These cupcakes were just the reminder my kiddos needed about what is important.

Makes me want to make these {little} yummies again!


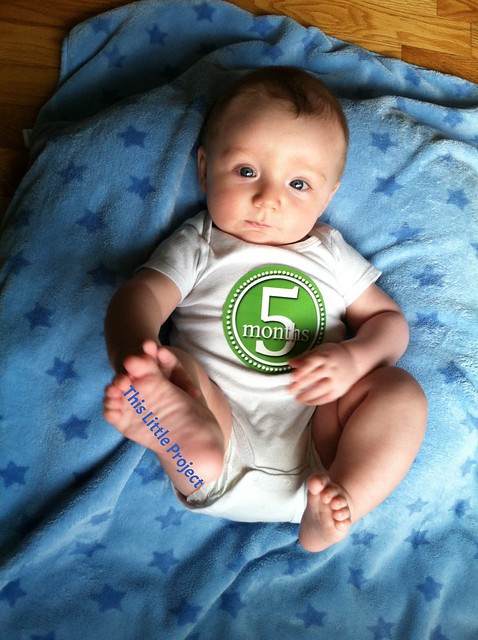
And my {little} boy hit the 5 month mark around Earth Day.  I can't believe it.  Since I haven't been blogging much since his birth, I haven't shared much about him.  He's the sweetest {little by little} major project there ever was!  I'm one lucky mommy!

onesie sticker by Purple Possum

In other Earth Day projects, our Cloth Diaper Project is up and going again with Baby M.

And since we're talking of Earth Day and babies, I read this today about children and motherhood and loved it.

(you can see past year's party ideas and Earth Day Projects here)

Also, today is the last day to enter the Shabby Apple giveaway (below)
--don't miss it!

Jay's Angry Birds Birthday Party


Jay told me he wanted to invite some friends over for an Angry Birds birthday party this year.  He told me this months ago and I was grateful for the warning because we would have a newborn when his birthday came around!

I tried to think ahead but I knew I would have to keep it simple.  And simple turned out to be perfect.  We had a ton of fun and baby M slept through the whole thing--perfect!


I wanted to have a fun game for the kids to play while we were waiting for the guests to arrive.  I made a Sling Shot Game and it was the perfect activity and it kept everyone busy and having a great time.

I had all kinds of blocks available for the kids to build structures with.  They built their structure and then they placed the green pom poms in them for the piggies.


I had a variety of sling shots and Angry Birds available to fling at their structures.  They loved it!


After the kids had fun knocking down their structures we went on a {little} Treasure Hunt --one with secret codes!


The treasure they were looking for was this nest of eggs (the eggs the green pigs stole!)


I filled the eggs up with Angry Birds Fruit Snacks.


I prepared enough Treasure Hunt clues for each guest.  
But they were in a secret code.  
This clue took them to the playroom. 
 

I used white 3x5 cards and wrote the clues out with a white crayon so they couldn't see the clue. I numbered the clues on the other side so I would remember what order they went when I placed them.

Then I gave each child a washable marker.  As they went around from one clue to the next each guest had a turn to "decode" the clue by coloring their marker over the card to show what it said. 
So easy!
And they LOVED it!

One of our favorite traditions is reusable gift wrap.  For each birthday I make a birthday shirt (see below for that) and I also make a gift bag that matches the theme of their birthday or goes along with something they like that year. It's fun to use the bags from the past and remember the fun years we've had and the celebrations we've had together of our special birthday boy!


I happened upon some clearance Angry Birds t-shirts and made one into a bag for this year.  The space bags worked perfectly with it too!


  I used one of my clearance shirts that I found for Jay's Birthday Shirt this year, and just added the 7 to the bottom right of the shirt.  I love {little} projects like that! 
(You might recognize the "7" fabric from other upcycled projects this winter ;)

  Jay wants to wear his birthday shirt everyday. I'm not kidding. 
 He loves it :)


I happened upon some sling shots at a garage sale this summer (perfect!) but here are some other places to find them:

 Oriental Trading
 Pinned Image

Etsy: Bird Sling Shot Party Favors


One of our family's favorite games is "Don't Eat Pete."  So I made an Angry Birds version (you can print it out below.)


The kids LOVED this {little} game!  And it's so easy to play and prepare!  The candy in the bowl was our "bird seed" and we used it to cover up each Angry Bird on the paper.

Then we went around the circle and each child had a turn being the one choosing the bird that "doesn't want to be eaten" and his neighbor went out of the room while it was being chosen.
Then he came back in and took a candy off each Angry Bird until he got to the one that had been "chosen."  When that happened everyone yelled, "Don't eat the bird!" and his turn was over.  The goal is to get as many treats as they can--what's not to love about that kind of game ;)

It was a hit! 
Here's a copy for you to enjoy (but not to sell.)

Angry Birds Game


I used this [free!!!] printable Angry Birds party kit for setting up a lot of the rest of the party.

It made putting the rest together truly a {little project}.

Free Printable Bithday Kit | Angry Birds

Here's what I used the Party Kit for:

Jay's Party invite: sample included on left in photo above.  I imported it to My Memories Suite --which I love! (use code: STMMMS60806 to save $10)
Using this software it was easy to customize it. 
The Angry Birds font is even included in the party kit!

I made cupcake toppers with toothpicks and a little glue.  I {heart} cupcakes so these were perfect and simple.  The colored sprinkles were enough to fancy them up!


The printable birthday banner--super simple and fun!
The kit comes with empty banner pieces to write the birthday boy's name in too!
  
And the Party Favors: 
 
I found the Angry Birds activity books at Joann Fabrics in the $1 book bins.


I had Angry Birds Fruit Snacks and and Angry Birds Cheese Nips in {little} baggies with the bag topper that is included in the kit.
Angry Birds Fruit Snacks 42 Pouch Assortment Variety BoxProduct Details
 
 
The Angry Birds Honey Grahams are also a perfect snack!

Party in the Sky


Want to add some whimsy in a snap?  
These tissue paper pom poms are just the thing.  They are perfect for any party or just for fun!  

I'm thinking Labor Day weekend, cheering up some back-to-school blues, or decorating a bedroom...so many possibilities!


We're celebrating fun in the playroom and back to school too with them.


They are super easy to make, and for all the fun these are, they're inexpensive to create.

Here is a quick tutorial.  I tried them in a few different sizes and I cut the ends like a spike/triangle instead of rounded.


We also made some tissue paper pom poms to celebrate the 4th of July.  My kids think they look like fireworks!  Really, they are great for many events!


Kinda makes you want to make up an excuse for a party, huh?


The Secret to Easy Gingerbread Houses

Want to know the secret for making
quick and easy gingerbread houses?

This is the princess castle we made for Miss Kay's princess birthday party.
It took all of a few minutes to make-and that's only because it was a big castle.

At this time of the year you need a few extra minutes!


So {This Little Project} secret is...
Use your hot glue gun!


The kids don't eat the graham crackers anyway-it's more about the candy, right?
And you'll still get that "snowy" frosting look when the candy gets plastered on with frosting ;)

I'm lucky enough to be visiting Elspeth right now. We're having a great time doing {Little Projects} and our kids are having an awesome cousin reunion.

And we've got 13 gingerbread houses to make for an upcoming party.
If you're like us...consider the glue gun.
(And be sure to let the parents know)


Cinco de Mayo

My husband graduated this week! It's been a lot of fun to have family in town and so many festivities. We celebrated Cinco de Mayo with some friends we will miss when we move in a few weeks. The {Little Project} we made to celebrate was this penguin pinata.

To make {This Little Project} you need:
a balloon
newspaper or a magazine ripped into pieces
yarn
paste made from 2 parts water to 1 part flour (with a pinch of salt)
paint
xacto knife
treats or prizes
1)Tie the yarn so that it fits over the inflated balloon with a little extra to hang it by.
2)Then wet the pieces of ripped paper in the paste. Put a layer under the yarn and a layer over the yarn as you go.
3) Cover the entire balloon this way.
4) Let dry overnight (we used a fan to speed the process).
5) Paint the character on and let dry.
6) Use a xacto knife to make a small opening in the balloon to put the prizes in through. (This will pop it.)
7) Add paper wings, beak, and feet, etc.
8) Put treats/surprises inside and tape the whole closed.
9) Use this fun day to teach your children about the Mexico culture.
10) Play to get the treats out!
Happy Cinco de Mayo!

Party HELP!?


It just hit me that Kay's birthday is coming up (I still have a few weeks) which means I need to start thinking about a party. I was just browsing Kara's Party Ideas...sheesh that girl is amazing! She did a barnyard party, which got me thinking that my little Kay's favorite things right now are: PIGS and PINK. The pigs things kind of drives me crazy! But it's her phase right now.

So now I guess I'm on a mission to see what I can do to come up with a pink pig theme for her party. Any ideas? I'm starting to feel overwhelmed already!  

Honestly, getting the details of how to feed and invite everyone is only the first step.
What am I going to do with everyone (and their parents) once they get here??
PLEASE share your tips and ideas!

Circle Sculpting: Liberty Bell

Have you ever had a project that didn't quite turn out the way you thought it would? That would be the definition of this project. I started it because I wanted to have some 4th of July decorations and we didn't bring any with us. The goal: make some red, white, and blue globes to hang up out of 4 pieces of paper. 
What actually happened: a sort of liberty bell. I learned a lot on the way though and will try to go for the globe look again. I just ran out of paper :)

I started with 2 12x12 papers and punched 1 3/4" circles out.

I used a cardboard equilateral triangle to fold each one.
Then I used a glue stick to glue them together so they look like this.  Can you tell it is the beginning of a globe look?

Well, this is where I started to run into trouble.  Do you see in the photo above that there are 5 "petals" to the "flower"?  Well, to make a globe/sphere shape you have to have the same number of petals in every flower as you go around.  I had some with 4 and some with six.  I decided to turn them all into 6 petal flowers.  It took a lot longer, got a lot bigger and then I ran out of paper.

But when I folded it together it looked like a bell.  And that has a liberty feel to it so I turned lemons into lemonade and went with it :)

The bell had the same issues: some "4 and some 5 petal flowers".  It gave it an oblong shape that was nice and small to provide the bell part.
All in all, we have a 4th of July decoration to hang up :)

I wish you success with your 4th of July Projects and I hope you will link in your Project of the Week below and share your ideas!
LinkWithin Related Stories Widget for Blogs Add to Technorati Favorites Share/Save/Bookmark