Showing posts with label Cookies. Show all posts

Gingerbread Activities: Playdough

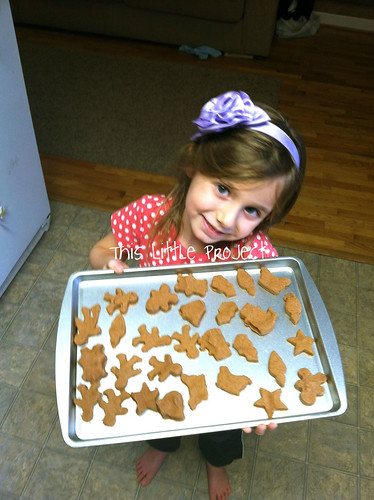
Hi Friends! Long time, no blogging.  But we have had so much fun with our gingerbread playdough that I wanted to pop in and say hi and share this fun {little project} with you.  


These photos were actually taken last year, not long after baby M was born.  He's one now!  It's been a big year for us with a lot of change and a cross country move too!

We had so much fun with our Gingerbread playdough last year, that I made it again this year.  It's a hit again, of course!

Here's the recipe for this yummy smelling playdough: 
(but don't eat it-it doesn't taste good!)

Gingerbread Playdough
Ingredients
  • 1 cup all purpose flour
  • 1/2 cup salt
  • 2 tsp. cream of tartar
  • 1 tbsp. ground cinnamon
  • 2 tsp. ground ginger
  • 1 tsp. ground nutmeg
  • 1 tsp. ground cloves
  • 2 tbsp. vegetable oil
  • 1 cup water
  • 1 tsp orange extract {optional}
Instructions:
  1. In a medium saucepan whisk together dry ingredients. Next mix in the water, oil, and orange extract and stir until a thick batter is formed. Cook the mixture over low/medium heat until a thick dough forms. Turn out onto parchment paper and knead until smooth. Makes about 2 cups of dough.

I love having a dollar store cookie sheet (or two!) on hand.  They are the perfect size for little ones and they loved putting their gingerbread "cookies" out on them.


My kids even started a "bakery" to sell their "cookies" and we had all kinds of math fun figuring out what the cost and what the change should be.  Playing is a great way to learn :)


Enjoy!

P.S. If you want the secret to EASY gingerbread houses, click here!

Chocolate Cranberry Crunch Cookies

Ok, I have a new favorite treat.  It's kinda like a cookie.  But it's more like chocolate yumminess!

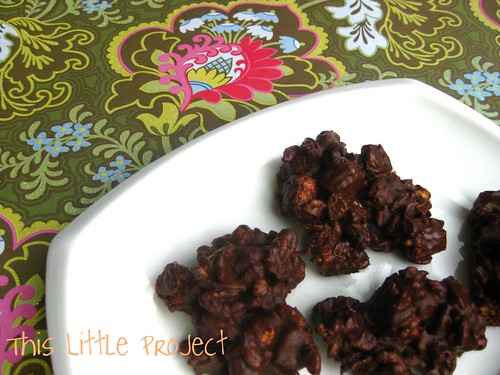
Meet the Chocolate Cranberry Crunch Cookies
(say that 3 times fast!)


My meeting this treat was born of trouble: I had no eggs on hand and needed to make cookies.  I hadn't really noticed before, but every cookie recipe has eggs in it!

But not this recipe!  And it doesn't have any oven time either, which can also be a bonus.

I can hardly tell you about {this little project} without needing to go eat it right now!

ok...self-control...

so here is what you need for {this little project}
(if there are ingredients you don't like, just leave those out and increase the others a little--it's all good!)


Chocolate Cranberry Crunch Cookies:
1 lb package of milk chocolate chips
1 cup of peanut butter (crunchy is yummier)
3/4 cup shredded coconut
1 1/2 cup mini marshmallows
1 cup dried cranberries
1/2 cup chopped nuts (pecans or slivered almonds)
3 1/2 cups rice crispies cereal
(you need wax paper, and cookie sheets too)


How to make {this little project}
First, I like to measure out my ingredients.  Because once the chocolate is melted the recipe goes fast and I don't want to worry about the chocolate cooling before I'm done combining all the ingredients.

Start by melting the chocolate chips (microwave or stove).  Stir periodically until all melted.

Then mix in the peanut butter, coconut, cranberries, nuts, marshmallows.  Then add the cereal.  Sometimes I add more  or sometimes less, depending on how chocolaty I want it to be.  But the crunchiness of the cereal is so yummy!


Then cover your cookie sheet(s) in wax paper and drop the chocolate yumminess into little mounds on it.

Move the cookie sheets to the refrigerator for 20 minutes to cool and set before eating (you really do need to do this for the cookies to set~but it tastes good without it too!)


It's best to keep them cool until just before it's time to serve them.  That way they don't melt too fast in your hand. 

If you store the cookies between wax paper in an air-tight container in the fridge they still taste perfect up to a week later.  You can freeze them that way for about 3 months.

These are great to have on hand in the freezer for surprise company!  I get compliments every time I serve them...and they are so easy 
(and you don't even need eggs to make them!)
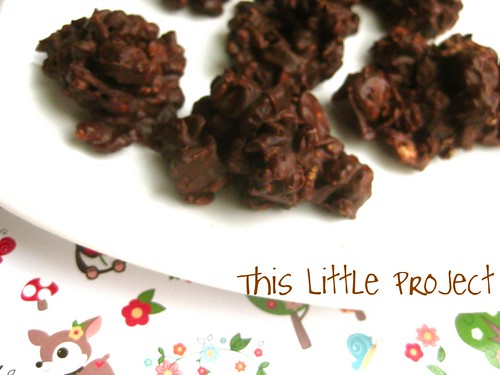


Seriously, a super yummy {little project} and perfect to share with your valentine 
or as part of the Kindness Project!


Kid's Kitchen Cookies

It's holiday baking time. If you have little ones around the house you may not want their "help." But the truth is that they love to be involved in the kitchen. Here is a quick cookie they can help make and then you may get the kitchen back to yourself to really get something done :)

Remember that time spent together in the kitchen is memories in the making :) Be sure to check out our Survival Tips for having kids in the kitchen so you will enjoy your memories!

To make these cookies you need:
Why use a mix? If you are going for the cooking satisfaction of a toddler/preschooler you have to be fast! They will love to help stir, put the cookie dough on the cookie sheet, and unwrap the kisses and put them on the cookies.

Make the cookies according to package directions. Kids can help put the little balls of dough on the cookie sheet. Then have the candies unwrapped and ready to put in RIGHT when they come out of the oven.

Festive.
Friendly for Kids.
Fun for the family!

Enjoy!

Bird's Nest Cookies

Some kids build blanket forts all over the house. My kids build blanket and pillow nests.  They are obsessed with birds right now.  So here are some bird's nest cookies from our house to yours. And a GREAT way to use up some of that Easter CANDY!

I have been organizing our DIY pantry (see this post) and noticed that we have a TON of peanut butter. So, it's time for peanut butter cookies with a Springtime twist.  Read on to see how to make a chocolate bird for your little cookie nest.

I used >this recipe. They turned out so soft and yummy. If you don't want to make a ton of one inch balls, just make bigger balls of dough and they make great nests.  I cooked them the same length of time. Some of our cookie balls were 2-3 inches big before they cooked.

The recipe calls for hershey kisses.  But chocolate eggs turn these cookies into little nests!  The cookies come out of the oven looking like little balls.  You just nestle these little chocolate eggs right down into them and they look so comfy!

If you are making these treats with kids, check out >these tips first.
Remember to have your chocolate unwrapped before they come out of the oven.  The chocolate goes on AS SOON AS they come out.

Here is a baby bird sitting with some little eggs.  Want to know how I made it?
It was an accident at first!  I accidently tipped a cookie with a kiss over when I was transferring the cookies to the cooling rack.  When I picked it up the top was bent over.  It looked just like a little bird!  So then I made a few more "accidents" on purpose.

Like this:
I used the back of a butter knife to first tip the top over to the left, and then to make a little feather stand up on top.  I was surprised how easy it was to "sculpt" the chocolate.

Just wait about 3-5 minutes after they come out of the oven to tip the top over.  The chocolate has to be melted enough for it to work.  But if you wait too long it is too melted and doesn't work as well.


Enjoy munching on This Little Project!

Mint-Chocolate Cream Cheese Cookies


I was introduced to these cookies by my friend Julie. They are oh so yummy so I had to share them! This time of the year is so tasty. Your neighbors will love these! Best of all, they are so EASY and FAST!!!

The recipe is one she found on the Food Network website and modified a little bit. It is like a mix of cheese cake and cookies.

Here is the new and improved recipe {variations I have tried are also listed below. The cookies pictured are a variation.}

Mint-Chocolate Cream Cheese Cookies:
Note: this recipe needs to chill for 2 hours (or overnight) so prepare ahead of time ;)
1 (8 ounce) pkg. cream cheese, room temperature
1 stick butter, at room temperature
1 egg
1 teaspoon vanilla extract
1 (18-ounce) box moist chocolate cake mix (the flavor you choose determines the kind of cookie-see suggestions below.)
Andes Chocolate mints chopped up (or any kind of chocolate chip) I used about 8 oz. but you probably can't have too much chocolate!
Crushed Candy Canes
Confectioners' sugar, for dusting

Directions:
In a large bowl with an electic mixer, cream the cream cheese and butter until smooth. Beat in the egg. Add the vanilla extract. Then, add the cake mix. Finally, stir in chocolate chips and cover and regrigerate for 2 hours to firm up.
Preheat oven to 350 degrees F.
Roll the chilled batter into tablespoon sized balls and then roll them in crushed candy canes. Place on an ungreased cokie sheet about 2 inches apart. Bake for 12 minutes. The cookies will remain soft and "gooey." Let cool before transferring to cooling rack. Sprinkle with confectioners' sugar, if desired.
That's it! What a YUMMY Little Project!

When I am in a hurry I don't roll them up into balls. They don't come out perfectly circular, but they still taste good!

Here are some Tasty variations (these don't use candy canes).
*Lemon Cake Mix+White Chocolate Chips
*Berry Cake+Raspberry/Chocolate Chips-this is the one that is pictured
*If you don't have Andes mints on hand try adding a little peppermint extract and using regular chocolate chips.

This is reminding me that I have a really great recipe book project to share. Watch for a great way to organize your favorite recipes-coming soon!
Enjoy your Little Project!

LinkWithin Related Stories Widget for Blogs Add to Technorati Favorites Share/Save/Bookmark