Showing posts with label Math. Show all posts

Gingerbread Activities: Playdough

Hi Friends! Long time, no blogging.  But we have had so much fun with our gingerbread playdough that I wanted to pop in and say hi and share this fun {little project} with you.  


These photos were actually taken last year, not long after baby M was born.  He's one now!  It's been a big year for us with a lot of change and a cross country move too!

We had so much fun with our Gingerbread playdough last year, that I made it again this year.  It's a hit again, of course!

Here's the recipe for this yummy smelling playdough: 
(but don't eat it-it doesn't taste good!)

Gingerbread Playdough
Ingredients
  • 1 cup all purpose flour
  • 1/2 cup salt
  • 2 tsp. cream of tartar
  • 1 tbsp. ground cinnamon
  • 2 tsp. ground ginger
  • 1 tsp. ground nutmeg
  • 1 tsp. ground cloves
  • 2 tbsp. vegetable oil
  • 1 cup water
  • 1 tsp orange extract {optional}
Instructions:
  1. In a medium saucepan whisk together dry ingredients. Next mix in the water, oil, and orange extract and stir until a thick batter is formed. Cook the mixture over low/medium heat until a thick dough forms. Turn out onto parchment paper and knead until smooth. Makes about 2 cups of dough.

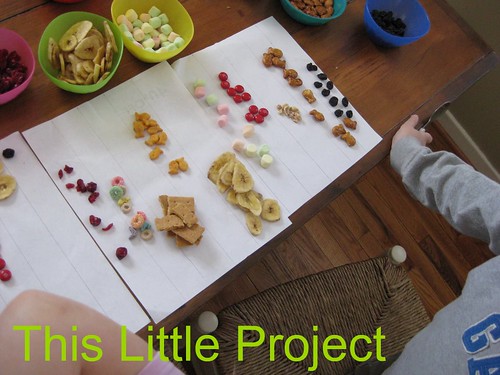
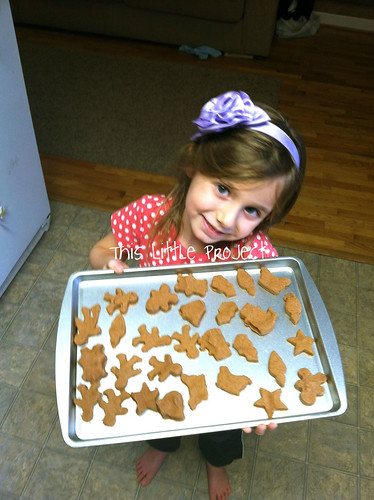
I love having a dollar store cookie sheet (or two!) on hand.  They are the perfect size for little ones and they loved putting their gingerbread "cookies" out on them.


My kids even started a "bakery" to sell their "cookies" and we had all kinds of math fun figuring out what the cost and what the change should be.  Playing is a great way to learn :)


Enjoy!

P.S. If you want the secret to EASY gingerbread houses, click here!

Valentine Math {part 2}


Our question today? Can candy make you smarter??
 
hmmm.  I know it's certainly motivating some math learning around here!

How much math fun can you have with a bag of chocolate kisses?

Here are a few {little} ideas we had fun with:

Division Practice Example: 24 kisses started in the heart. 
Then Jay separated them into 3 groups to see how many 24 divides into.

Greater/Less Than Game:  Of course we used the alligator mouth/heart again!


Estimating: 3 colors of kisses.  How many of each?
We always count in spanish too :)


Grouping (division/multiplication): How many groups of five?
Practice counting by 5's (sing to tune of 10 Little Indians)
Adding/Subtracting in groups of 5 (and 2)

 
Since these are our games from last year, I'm looking forward to playing more advanced math games this year.  
 
The kids are always moving forward in math and that keeps it exciting!


Valentine Candy Math {part 1}

The secret to learning at our house is to keep the kiddos excited.  And they always get excited when there is candy involved!  Their Valentine's Day loot is perfect for lots of math learning.

With Valentine's Day coming up I've been thinking about what games we will play this year.  I never take photos ahead of time, just during the real deal so these are some of our games from last year (in 2 separate posts)!

Greater than/Less than with Hearts: (an example with coins)

I love the idea of an alligator mouth wanting to eat the biggest number to show greatest.
It's the way I learned when I was {little} and so I play these kinds of games with my {littles} now.  And a heart is the perfect shape for it!

Depending on the age you are working with, you can change the greater/less than game up.  I did simple coins with Kay, more complex with Jay, and used groups of candy as well.  The kids turned the heart with the jaws to eat the one with more.  They loved it!


 Color matching/sorting with candy hearts.  We always graph these as well.


Sizing: small, medium, large:
This is great for toddlers and preschoolers. 
After you sort all the candy you can graph it too!


Any {little} project with a treat is extra fun!

Here are some of our other {little} candy math projects:
Valentine Math 2010
Halloween Math 2012
100th Day of the Year /Easter 2009

Look for part 2 of our Valentine Math soon!
 

After-Halloween Math

This is what it looked like at our house after everyone brought home their trick-or-treating loot.

It's waaaay too much candy.  So our tradition is that the first thing we do is take 5 favorites out and dump the rest of everyone's candy into a bowl and sort it by color.
The kids record the number of each color on each colored paper.  My kids had two nights of trick-or-treating so we did this twice-recording the second number on the underside.

Then we compared by graphing all the colors from one night to the graph the kids made of the second night.  The graph happens the day after, of course.  For the record, the first night had more candy overall.

{little} Ellie also sorted the candies by size and shape later on (no photo).  I love using something that they care about to do learning games with.  Finishing with a treat is the part that they love! 
But my favorite part of {this little project} is that since everyone's candy is in one bowl it isn't really anyone's.  So it lasts a lot longer and no one eats too much.  We were just finishing last year's bowl when it was time to refill it for this year!

Multiplication Practice Cards {the Best!}

Do you remember learning your "times tables?"  I remember that they were on the wall in the form of paper ice cream cones in 2nd grade.  As I was trying to help Jay learn his times tables, I wanted something easy to work with and that was portable.
 
This is what I came up with.  I made these Multiplication Practice Cards for Jay about a year ago. 
These {little} houses are easy to make and made learning them easier.


The reason I love them and think they are {the best little idea} I've had for awhile, is because you don't have to haul around a whole stack of flash cards.  Just 12 little houses make up the whole set.

Also, it's easy to see how the numbers compound.  I think that makes the multiplication make more sense.  When Jay was learning them I would tuck a house or two in my purse when we went to the doctor's office or give him one to look over in the car if we had a bunch of errands to run.  
 
 
I was going through some math supplies and found them again.  So Kay had a fun time quizzing him on them :)


To make {This Little Project} you need:

3 pieces of brown construction paper
6 pieces of white paper
6 pieces of colored paper
a stapler
an exacto/craft knife

1-Start by cutting the white and colored pieces in half so they are half sheets of paper (8.5x 5.5.)  These will make the front and back of the "houses."


2-  Cut 12 triangles of brown paper to fit your "houses."

3- Use your craft knife to cut "doors" into the colored pieces of the houses.  I just eyeballed this and then used the first one as a template to make the others.  Remember to just cut 3 sides of the door.  You need 12 doors on each "house."

4- Now staple the white papers to the back of the colored "houses" and staple the roof on.

5- Title the houses (1-12) and write the problems on the outside of the "doors" and then the answers inside the door.


Your child can quiz himself and check to see if he is right.  Or his little sister could too!


I love it when learning gets a {little} easier :)


How to Teach Even and Odd for Kids

I've been meaning to share {this little project} for months now.  Thanks for hanging with me through all the ups and downs of life (and pregnancy) that affect how often I get a {little} bit posted here!

I was working with Kay (months ago!) on her odd and even numbers.  She is my hands-on learner so I wanted a clear way for her to be able to "touch" the concept.

This is what I came up with:
 

Her tray has a box of numbers (up to 10 for now) with an ice cube tray and flower stickers.

As she counted out the flowers in the tray I had her put the next one as the "neighbor."  By that, I mean that she did one on the top row and then on on the bottom row.  

At the end, if all the flowers had a "neighbor" then it was an even number--because it worked in sets of 2's.
If a flower was left alone, it was an odd number.
 

And, the reason I'm sharing {this little project} is because it worked!  She figured out the concept and we were quickly able to move to larger numbers.

Yay for those {little} moments that make sense!

Celebrating 100 Days!

 
How many ways can you celebrate 100?  This is our 4th year celebrating the 100th day of the year.  Every time we have our "party" I try to think up ways for the kids to learn while they think they are playing.

This year the kids are another year older and we were able to add a spanish twist and counted in spanish, since they can already count in english by 1's, 5's, 10's, etc.  I used the foam letters (above) for a visual for Kay.  She always does better if she has something to touch.  I know part of that is her age, and part of it is just her :)

This year, I got started a little early with this book for Kay.  I didn't know how hard it would be for her to work through 100 words.  But it was a fun goal.  The book was too long for her to read in one sitting, but we used it over a week for reading time and she got all 100 words!


Kay is a preschooler, but she likes to read.  And the fun thing about this book is that the dog's words are red and the man's words are black (or maybe the other way around).  So I read one color of word and she looked for "her words" in the other color.  That helped keep her interest in it.

Jay is in kindergarten and LOVES math.  He's been working through his times tables (which I have a bunch of projects to share about sometime...) and so we decided to see how close we could get to 100 with multiplying 4's, 7's, 8's, and 9's.  The legos really helped keep his interest with {this little project}.

Kay and Jay each took a side of this lego plate and used the "4" lego bricks to see how many it took to made 100.   The legos let you "touch" each number, which was good for Kay.


We used the "6" lego brick with the "1" for the 7's.
One thing that Jay noticed from this activity was that it was hard to land right on 100.  Not everything divides evenly.


Then I got out some of our dice to play some games with.
The Roll to 100 is an adding game.

Jay wrote down each roll and added it to the roll before.  The goal was to land right on 100 and not go over.  This is much easier said, than done!

He played it over and over, determined to get it.  And he finally did!


I gave the dice to Kay too to play with.  She's not into adding double digits yet, but she wrote down each roll and practiced her handwriting and knowing what each number was.

For the Roll to $1.00 Game, I got out our coin dice that I made (from a previous little math project).  Again, Jay wrote down each roll and added it to the one before.  The goal: try to get to $1.00 without going over.

Again, easier said than done!  But we turned it into an adding and subtracting game after we changed the rules so that if you went over you could do one more roll and subtract it to see if you landed on 100 cents.

Jay really enjoyed both math dice games and played them again and again.


And you have to have some party food right?

Here is our centipede snack:


He doesn't quite have 100 legs, but... close enough.

We made him with a sliced banana, craisins for eyes, and halved cheerios for legs.  I would have used pretzels for the legs but we ran out.

The kids dipped him in yogurt and thought it was a great snack (whew!)


Now we're looking forward to celebrating 100 next year!
If you have any fun ideas, please share!

And with all this 100 fun, be sure to enter the PrintRunner Giveaway for 100 free full-color postcards!  Go here to enter!

Egg Carton Math Games

We've been using {this little project} this week to practice math.  It's kind of like the handwriting helper {project} we did before.  

It makes math into a game!


So, how does {this little} math helper work?

All you need is a numbered egg carton and 2 different colored pom poms to play the game.

Toss both pom poms into the egg carton.  


There are a bunch of ways to use {this little project} as a game.  


First, math game ideas for the older kids:


If you are doing subtraction you write down the larger of the numbers and subtract the other number that the pom pom landed in from it.


Write both numbers down and then < or > for the greater/smaller.


For addition, add both the numbers together that the pom poms landed in.


For multiplication...you get it...you multiply them....etc.


Math Game Ideas for younger kids:


Toss both in and figure out which one is the larger number.  Which is the smaller number?


Toss just one in and practice writing the number.


Toss two in and make it a double digit number and say and write what it is.


My kids are young and love to use manipulatives for math.  


Whichever game we choose to play we like to get out the chalkboard or whiteboard.  Somehow that makes it more of a game than just using a pencil and paper.


 I always feel good when we re-use something from the invention box so doing {this little project} was double the fun :)


Pin It

Money Math

A few months ago Jay saw a coinstar machine and it kind of turned a light on for him as far as interest in learning about money.  For the past few weeks he's been earning his pennies with a little summer job and dreaming about what he should save them for and all the fun things he could do with them.  

I love it when learning like this happens naturally.  So, naturally I had to make some fun money games for us to play! 

Below you will find ideas for preschool-3rd grade money play/learning.

These coin dice have been so fun for us.  When I looked around the web thinking I would just purchase them I found these but I decided to make them instead.  I like them even better! (how-to below.)

Some games we play:
Just coin dice: roll one die, write the amount of cents, roll the plus/ minus die (or just decide which you will be doing for the game), roll another coin die, write the amount down.  Add or subtract them.  Write it down.

Coin or Dollar dice: Roll one die and then another.  Is the second coin/dollar rolled greater/less than/or equal to the first coin rolled?

Coin die and Dollar die:  roll the coin die, write the amount of cents, roll the plus/ minus die (or just decide which you will be doing for the game), roll the dollar die, write the amount down.  Add them together.  Write it down.  You can do this with subtraction if you start with the dollar die first.  This is great practice for making change.

Dollar and Dollar dice: roll one dollar die, write the amount down, roll the plus/ minus die (or just decide which you will be doing for the game), roll the other dollar die, write the amount down.  Add them together.  Write it down.

It's even more fun if you get your play money out (or real!) and get the right one out when you roll it.  When I got real money out for this game my kids were even more interested in learning about money (and practicing their math!)

Want to make {This Little Project} too?

You need:
 money stickers from Dollar Tree (in their ed. materials)--these stickers are just a picture of each coin and dollar with their amounts written underneath.

Five 1 inch wooden cubes (from craft store or Here)

Modge Podge

(total cost: about $2.00)

You will want 2 coin, 2 dollar, and 1 plus/minus/greater/=/less than cube.

Just cut the coin stickers apart because they come on one big sticker.  I made these tally sheets for Kay to use from the left-over parts of the stickers.  She's not quite ready to do a lot of math with money yet but she's interested in learning coin recognition.  So she rolls the dice and marks a line for each kind.


The $1,5,10,20,50 dollar stickers don't quite fit on the cubes (unless you have bigger wood cubes too) so I just cut enough to make it obvious which dollar bill it was.

After your stickers are cut out, put a layer of modge podge on, lay the sticker on top, let it dry.  Then put a layer of modge podge over the top of the sticker too and let it dry.  Easy and quick!

Now you are ready for lots of fun!

And if you have older money savvy kids you will like this simple online game of making change.  Jay played this a few times over a couple of weeks and still really enjoys it.  Find it Here.


Want one more fun idea?  Make your own store! 
 If you need a cash register (we did) 
this one is inexpensive ($10) and works great.

Learning is always more fun when it's more like playing 
(be it a game or a store!)  Have fun!

Pin It
sharing here too:


abc button

100th Day Fun!


You may not have realized it, but April means that the 100th day of the year is here!

We were still on vacation on the actual day (April 10th) but did some fun things to learn about 100 before we left and since we got back. 

 Since we're still in the hundreds (today is 104) I figure 
the party is still on! 

You know that we'll take any excuse for a party around here!

We had a lot of fun making our 100 piece trail mix.  The packet (see below) comes with a printable for this but I just divided papers with columns so it would be easier for Kay to count hers out.
These are our 10 bowls of choices: graham pieces, fruitloops, fishies, pretzle fish, marshmallows, m&ms, craisins, raisins, peanuts, and banana chips


We also made caterpillars by circle cutting paper and writing numbers to practice skip-counting by 5.  Then did it with nickels and dimes.  
Lots of ways to count to 100!


There is also a great packet (shown above) that we've been enjoying that you can print out at Whattheteacherwants.

So, if you didn't get to celebrate the 100th day, there's still time to party!  Have fun!


LinkWithin Related Stories Widget for Blogs Add to Technorati Favorites Share/Save/Bookmark