Showing posts with label Homemade. Show all posts

Gingerbread Activities: Playdough

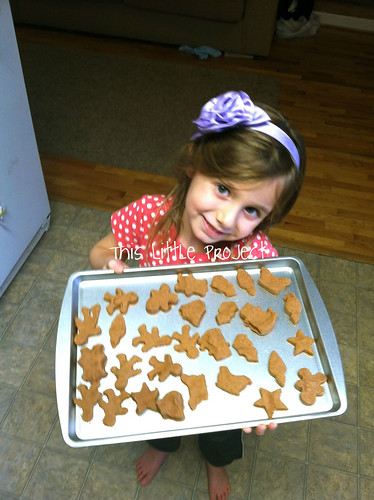
Hi Friends! Long time, no blogging.  But we have had so much fun with our gingerbread playdough that I wanted to pop in and say hi and share this fun {little project} with you.  


These photos were actually taken last year, not long after baby M was born.  He's one now!  It's been a big year for us with a lot of change and a cross country move too!

We had so much fun with our Gingerbread playdough last year, that I made it again this year.  It's a hit again, of course!

Here's the recipe for this yummy smelling playdough: 
(but don't eat it-it doesn't taste good!)

Gingerbread Playdough
Ingredients
  • 1 cup all purpose flour
  • 1/2 cup salt
  • 2 tsp. cream of tartar
  • 1 tbsp. ground cinnamon
  • 2 tsp. ground ginger
  • 1 tsp. ground nutmeg
  • 1 tsp. ground cloves
  • 2 tbsp. vegetable oil
  • 1 cup water
  • 1 tsp orange extract {optional}
Instructions:
  1. In a medium saucepan whisk together dry ingredients. Next mix in the water, oil, and orange extract and stir until a thick batter is formed. Cook the mixture over low/medium heat until a thick dough forms. Turn out onto parchment paper and knead until smooth. Makes about 2 cups of dough.

I love having a dollar store cookie sheet (or two!) on hand.  They are the perfect size for little ones and they loved putting their gingerbread "cookies" out on them.


My kids even started a "bakery" to sell their "cookies" and we had all kinds of math fun figuring out what the cost and what the change should be.  Playing is a great way to learn :)


Enjoy!

P.S. If you want the secret to EASY gingerbread houses, click here!

No-Sew Valentine Ruffle Pillow


If you are a regular reader, you know I'm a big fan of {little} projects because I can get them done.  And this no-sew ruffle pillow certainly qualifies!
I love making pillow covers because it's so fun to be able to switch over monthly decor in a snap.
So, I picked a fabric and wrapped it around my throw pillow to determine how much fabric I needed.  
It should overlap at least an inch in the middle on the back.


 Then I found the center of the front and started "drawing" my ruffled heart with this darling gingham ruffled trim from Hobby Lobby.  
I love it because it is ruffled down the center so both sides are ruffled!  I also love it because it was $1.50 for 3 yards and I didn't need nearly all of it.

I just pinned around the original size of the heart to make sure I liked the size and then used hot glue between the pins to hold it in place.

Then I took out the pins and glued under those spots too.

I used the pins to pin the next layer/section of the heart and repeated the hot glue and pinning until I made it to the middle.

It's a stretchy trim so be careful not to stretch as you go.     


 The heart is in the center of the fabric like this:


Now to turn it into a pillow cover you just fold back the 2 side edges to hem (either use hot glue or sew).

Then put the heart facing your pillow (inside out) and wrap it around to determine the size (like at the first) and then pin the overlap.

Remove the pillow. And then either hot glue the top and bottom edges or sew them since it's a nice straight line! :)

Then turn it right-side out and stuff your pillow inside!


Easy.  Done.
I told you it was a {little} project ;)  

Mother's Day Projects

If you are like me and haven't quite put the finishing touches on your Mother's Day projects, you may enjoy some inspiration. For our Grandma's I am sending some silhouettes of the kids. I was inspired by some sweet silhouettes I saw around the web. Search Silhouette Portriat on Etsy (photo above from Etsy link at left) and you will see what I mean. I'm totally inspired! 

I just took photos of the kids at profile, cut them out...and put them on black.  I am also doing some on fabric to put on a pillow. It's one way to do a long distance hug.  Happily, mine are almost done for our Grandmas because I want to make some of the kids for my house too :)

If that isn't your style, here are some more ideas:
Messages in a handmade box

There are some darling free printables for Mom: a card and bookmard as well as tags from Living Locurto.
Many Moms I know love chocolate, so this chocolate painting idea seems like a fun way to personalize the chocolate giving.
For the kids, this MACARONI PORTRAIT idea caught my attention.
This Photo Project from our archives would also be a nice personalized I love you.

Happy Mother's Day to all you FABULOUS MOMS! Thanks for stopping by :)

How to Make Homemade Maracas

As usual, we look forward to an excuse to have a little fun around here. Being that today is Cinco de Mayo, we went for some homemade maracas (from plastic Easter eggs) and a skirt made from 2 place mats (from the dollar store) and quesdillas for lunch (of course).

To make some noise and celebrate, here are some easy directions for homemade maracas (being a music teacher, I'm excited to add these to our collection!)

You need: Plastic Easter eggs, beans, rice, flour, water, salt, crepe paper, modge podge or other sealer.

Put some rice and beans into your plastic egg and then close it. (of course, you may choose anything that is noisy. Beans and rice were handy and appropriate for the day.)

For the "glue" you need one part flour to two parts water. I added about 1.5 teaspoons of salt. The amount of mix will vary depending on how many you make.

Cut your crepe paper (I used the kind that you can make streamers with and comes on a roll) into pieces. Dip the pieces of crepe paper in the "flour sauce" and put them over your plastic egg. Cover it with a couple of layers and let it dry.

When it is dry put a layer or two of modge podge to seal it so it will last through lots of fun noise making.

Play, shake, and listen!
I put a few more flowers hair clips in the shop so you can crown your princess with flowers too :)

I've had this white trim for awhile and it seemed like the perfect thing to dress up a skirt I made from 2 dollar store place mats. Little Kay loves it!
Happy Cinco de Mayo!

How to make a Book (from ONE piece of paper!)


In honor of Dr. Seuss' birthday on Monday, March 2nd, we are making little books around here. Want to join in the fun?

This book is made from ONE piece of paper with just 3 cuts! Here is what you will need: 1 piece of 12"x12" CARD STOCK works best, but paper might do if you don't have some. You will also need some scissors and a glue stick. That's it!


This is what our "Book of Love" looked like from Valentine's Day. You can make yours be about anything. My friend Jessica taught me how to make these. She used them to teach a pre-school lesson. Some things we've tried: my 5 senses, nativity book, shapers, letters, math, my favorites, etc. There are 15 pages when we are done!

This time I will have the kids illustrate the book and then ask them to tell me what each picture is about and I will write that in.

Here are the instructions. I used paper that is green on one side and blue on the other to help you see the process better.  Let me know if you need more info :)

1-Take your 12"x12" cardstock paper and fold it in half.
2-Then take one side and fold it into your middle-fold.
3- Do step 2 with the other side too.

4-Then turn the paper so the folds you just made are going horizontally in front of you and fold the paper vertically in half the other way too.
5-Now repeat step 2 folding the paper into the middle-fold. 
6-Now repeat step 3 and fold the other side into the middle-fold.
Here is what your paper looks like now.  There should be 16 little boxes.
You can see all the boxes here.


7-The 1st cut:  Start from the lower left side and cut up the first strip along the fold line-STOP---before you cut the last box.  You should only cut the first 3 boxes and then stop at the fold line for the last box.
I must have not photographed the next part well...so here is what the next 2 steps look like done!  This is what I did:  

8-The 2nd cut comes from the other direction.  Start cutting from the top of the paper----and STOP---when you get to the fold of the 4th box.  You should only cut 3 boxes.

9- The 3rd cut comes from the lower side again-like the 1st cut.  Cut 3 boxes and then STOP!  Don't cut into the 4th box.  All of these cuts are just cutting along the fold lines.

Now you start folding.
We are just folding along the lines you have already created. Some will fold Up and some are Down. It's kind of like folding a fan :)

1-Start from the lower left side and fold up.  You can see here that my paper is blue on the other side.  Hopefully that will help you see how this is done.  
2- This is kind of like folding a fan...Then next fold goes down:
3-The last fold for the first cut goes up.  It should look like this:
4-Now take that bunch and fold it down, under the 2nd strip of paper like this:
5-Now fold up for the next fold like this:
6-Now fold down to go under like this:
7- Now fold up so that when you finish that row it looks like this:
8- To start folding into the next row you need to fold down to bring the bunch under like this:
9-Now fold up to look like this:
20-Next fold the bunch down to go under like this:
11-Here you are at the end of that row by folding the bunch up:
12-To start the last row, just fold the bunch down to go under like this:
13- Now fold up, so the bunch is on top, like this:
14-Now fold the bunch down to go under-you're almost done!
15-Now fold up to finish like this:
Good job!  It was just like folding a fan (sort of)!


Now we GLUE:
Put your folded paper down so that it looks like this:
 You will have MOUNTAINS AND VALLEYS.  Then you will have a few folds that open to the front or the back that don't make good mountains and valleys.  Those are where you glue first.

1-glue here (not a good mountain/valley)
2-Then glue here, towards the middle:
3- Here is the last "non-mountain or valley."  Do you like all these "technical" terms :)
4-After you finish those 3 glue spots, your book looks like this: all mountains and valleys!
5-Now lay the book on it's side like this:

The "blue" side of the paper is on the inside.  That is the side we will be gluing.

6-Glue here on the "blue" side:
7-Next glue here on the "blue" side:
8-Now glue here on the "blue" side:
9- Lastly, glue here on the "blue"side:

This is what the book looks like after gluing all the "blue" sides:
You can be done right now and you will have 9 pages (including the front and back cover) or you can glue the ends in to make them sturdier and finish with 7 pages (14 front and back).

10-If you want to glue the covers to make them sturdier, glue the "green" side here:

11-And glue the "green" side here:

Now your book looks like this:

Now lay your book back down and it looks like this (size compared to the scissors).

Yippee, you are done!

Now, you can title your book anything you want and start writing!
There you have it: your own book!  That was a fun Little Project! If you would like more Dr. Seuss fun, check out how to make a Wocket Pocket and ABC Word Food.

LinkWithin Related Stories Widget for Blogs Add to Technorati Favorites Share/Save/Bookmark