Showing posts with label Alphabet. Show all posts

B is for Bear Hunt

This past week I had some little people over for some preschool fun.  We were working with the letter B and Ellie's favorite book right now is We're Going on a Bear Hunt.  She has it all memorized.  So I knew we had to have some fun with BEARS!  Here are a few of the things we did to celebrate the letter B!

Of course we read the book together.  


And then we had some more Bear Hunt fun.
The kids took turns hiding the bear and hunting for it.  The child that hid the bear would clap louder and faster when the children got closer until they found it!
 

Our Bear Hunt snack was hiding little Teddy Grahams in Brown pudding.


and then hunting for them in the brown pudding cave!


While the Bear Hunt snack was going on, the kids covered their B page with Bears, Buttons, and Beans--for fine motor building.


Ellie loves doing buttons on her dot letters on her light table.  The buttons glow with the light behind them!


To print your own Dot Letters, check out these printables.

Have a Beary good day!

Alphabet Matching with Plastic Eggs

Kay has got her capital letters down and we are working on lowercase letters. {This Little Project} was a fun way to practice matching them.

I picked up a bag of 2 dozen smaller plastic eggs. A sharpie marker works well to write the uppercase letter on the top half and the lowercase letter on the bottom half. With 24 eggs you get almost the whole alphabet. You get to choose which 2 letters get left out :)

Since 24 is a lot for a little person to sort through, I split the group in half and gave 12 to Jay and 12 to Kay. After awhile we switched eggs.

(sorry I can't get this photo to turn)


Just put the "bottoms" in one pile and the "tops" in the other pile. The played for a long time on multiple days with this game!
Enjoy!

Doodle Rubbings

We had a lot of fun making what we call "Doodle Rubbings" this weekend. I think these are a fun learning tool.  These doodle rubbings are so quick and easy to make and they can be used by lots of kids (think play group or preschool, etc.)  Some themes we did were: emotions, things that fly, shapes, colors and names.

To make some Doodle Rubbings, here are some {Little Project} Tips:
*Materials you Need: Glue gun, cardboard, crayons, paper clips or binder clips

1- Cut your cardboard to size.  I used cereal box cardboard.  If you are going to have a lot of children participate you may want to use the heavy kind of cardboard instead, since it is harder to bend.  Use longer pieces of cardboard for words and names.

You can use smaller pieces for single pictures (happy and sad):
2-With the glue gun, just "draw" your picture.  I found that it was easier to draw when I put the glue gun right down on the cardboard.  This creates a flatter line of glue which works just as well for the coloring.  The nice thing about hot glue is that it is quite forgiving.  After it dries, if it didn't turn out well I could pull it off and do it again :)   You can also draw the image first on the cardboard before you do the hot glue part (I did that for the bird.)

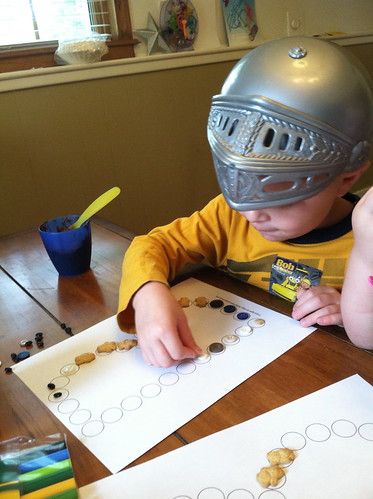
3-To keep the Doodle Rubbing in place while coloring, use a paper clip or binder clip.
4-When coloring, encourage broad, lighter strokes.  The heavier strokes make it harder for the child to tell what the image is.

 You can use more than one color too in the rubbings.

The possibilities are endlessly fun with {This Little doodle Project}  I'm thinking of doing some dinosaurs and fossils next and also using this method when we learn about skeletons.

Making Doodle Rubbings of each child's name makes them feel really special.  Their eyes light up when they see their name come through!  

You could also make Doodle Rubbings as an activity when learning phone numbers, address, etc.  
Doing our Doodle Rubbings was fun partly because it feels like a secret message is coming through as you color over them.
Have fun creating some Doodle time for the little ones in your life!

Messages from the Sun

You know those little magnetic letters that end up all over the place?  Well, here is a fun summertime project you can do with them outside that teaches about words and sunshine:
Materials: construction paper, magnetic letters, sunshine, paperweight if it is windy.

To get a message from the sun:
1. Let your child choose words s/he likes and get the letters for them.
Some children like words because they can spell them; like sun or frog.
Others like words because they are meaningful to them; like doll or grandma.
2. Let the child help you form the words on the construction paper in a sunny place.
3.  You may want to use a paperweight.  Our main struggle was the wind with this project.
4. wait....wait...wait...don't touch it for a couple of hours.
5.  Then go out and see what message the sun left!

 When you take off the letters the paper has faded everywhere that the letters were not sitting.

Here's how one of ours turned out (don't be scared away by the bad photo ;)
{This Little Project} was a fun way to explore letters, words, and the sunshine.  Enjoy!

Remarkable Marker Fun

Most people think of dry erase markers on just the white board that they come with.  Did you know that dry erase markers work perfectly well on mirrors too?  

Below are 3 more surfaces and activities that are remarkably more fun with these fun little markers.  If you don't trust your little one with dry erase markers washable markers work too :)

Try doing a self-portrait right in front of the mirror.
Kids can make all kinds of expressions in the mirror and then draw them "on themselves."
Mirror writing is also a fun way to write reminders.  It's a great place to display sight words.  We also use it as a place for Spanish words we are learning.  Most families spend some time in front of the mirror.  You can write messages to each other too!

A dry erase marker on a laminated surface can make reviewing something so exciting!  Jay normally might not want to review how to draw each letter.  But with a dry erase marker it is an adventure he won't miss.  (He's using a placemat from the dollar store in this activity.)
 I draw a little dot on each letter so he remembers where to start and then he's off to draw them all-no complaints!  We've also used this technique with maps, etc.

Dry erase markers also work well on windows.   We use window writing to practice writing words.  It's way more exciting on the window then on "normal" paper!  They are great for rainy days too!
Dry erase markers are temporary on these surfaces but they come off easiest if they don't sit for a long time.  Remember to keep the dry erase markers OUT of REACH except for special occasions and to keep a good eye out while they are in use.  If you opt for washable markers (I do with Kay) then just use water to wash them away.
I hope you have fun with This Little Project!

Make your own ABC PUZZLE


We have had so much playing with these I thought I would share the idea, in case any other little ones might like it too.
Jay is really into puzzles and letters so these have been great (and cheap!) toys :)

Supplies: thin cardboard (cereal boxes work great), permanent markers, "scrapbook-type" scissors.


1- cut strips of cardboard (ours were 2" tall)
2- Cut those up into pieces (ours were 2"x2.5")
3-Using a variety of scrapbook scissors (you know, the kinds with the fancy edges) cut down the middle of each piece.

4- Write the uppercase of the letter on one side and the matching lowercase letter on the other side.
{Little Project Tip:} I wrote all of the vowels with the same color of marker so we could talk about them and the sounds they make.

5-Ideas for how to Play with your ABC PUZZLE:
* Play a matching game: upper and lowercase to form the puzzles for each letter

* Memory game: turn them over and try to find the right matches-(the back of the cereal box may give them away. You can cover that or use blank cardboard.)

* Find things around things around the house that start with that letter


* Use the letters to spell words and/or sentences.


Have fun with this Little ABC puzzle Project!


Dr. Seuss Day


Happy Birthday Dr. Seuss! We love having an excuse to have a party!
Below you will find our Cat in the Hat hats, chocolate drawings, Rhyming Hat sheet and GAME, and a Cat in the Hat TREAT!

We've been watching some of the older Dr. Seuss movies (the animation is the same as the books) which are fun because they have some cute song in them too.

If you need a "cat in the hat" hat, here's how to make one:
It is similar to the one we made for our President's Day Party.

1st- Get a paper plate and cut the inside out of it.

2-Then we cut 2.25" strips of paper and 
3-taped them together.  They are long enough to go around the middle (circumference) of the hat.  

Jay really enjoyed all the taping that we did.  It was good practice for him. 
4-Tape all the stripes together. 
5-Next you need to roll the stripes into a tube that is the size of the opening of the top of your hat and tape to hold the tube together.  Is tube the right word?  It should look like a cylinder.
{Project Tip:} If you put the side with all the tape pieces on the inside of the cylinder it looks better :)

5-Then tape the striped cylinder to the inside of the paper plate.  I used about 4 pieces going from the inside of the cylinder to the underside of the paper plate. 

And then put it on your head!

Baby Kay wanted a purple one (her new word this week is purple).

And since my kiddos are pretty much Thing 1 and Thing 2 incarnate, I let them make a big mess drawing letters in chocolate pudding (and eating it too!)  It seemed like a Seussish thing to do.
yummy words!
Just spread chocolate (or any flavor) pudding on a cookie sheet and use your fingers to carve away.  They wanted to use utensils to carve too.  Then just re-spread it out to make new words.
{Project Tip} don't leave Thing 1 and 2 unattended, even for a minute.  You will regret it (I did!)

We hat fun doing THIS Cat in the Hat rhyming sheet!
Below is a game we made up to practice making rhyming words.  Just cut strips of cardboard from a cereal box.  Use different colors to make the ends of words (click on the picture to see closer).  Then just change the letters around and say them out loud to hear the rhymes!

And here  is our "Cat in the Hat Treat" of red and white stripes.
To make yours, you need strawberries, red jello, and yogurt (or vanilla pudding).  Just layer the yogurt in the glass and put the strawberries around the edge of the glass.  Fill the inside of the red layer with red jello.  Then repeat!  Yummy!


Have a Happy Seuss kind of day with a Seussish Little Project!

Check out the Crafty Crow to see our "Wocket" Little Project that was featured there and more for Dr. Seuss Day!

LinkWithin Related Stories Widget for Blogs Add to Technorati Favorites Share/Save/Bookmark